As a native of Erie, Pennsylvania, I grew up eating “pepperoni balls.” To the rest of the nation, however, these are called Pepperoni Rolls. I say this because I am going to try to remember to refer to them by their more common name but the Erie girl in me may pop up and stick her head into this post.
There’s nothing better than a tray of freshly baked pepperoni rolls. They fill the house with their warm, slightly garlic fragrance until you can hardly wait to pull them out of the oven. If fact, I almost always burn my tongue by attempting to immediately eat one when they’re ready. They are irresistible.
RELATED POST: Cheese Pepperoni Sausage Pizza Pasta Quick Cooker Recipe
QUICK NOTES
This recipe is based off my Easy Homemade Dinner Rolls dough. It is a quick-rising and versatile dough that I use for multiple dinner roll variations. This is one of those variations that I wanted to share.
Some pepperoni rolls are deep fried. Boy, that’s the Erie way to make pepperoni balls that I remember and it’s delicious. However, I bake mine to cut out the fat. Trust me. I do realize these aren’t on the healthy food list, but at least I’m skipping the frying.
GETTING READY
When you are following the recipe, be sure to make it your own. I used mozzarella cheese today because I had it on hand. But sometimes I have used cheddar or Monterey jack. Moreover, I have found that using 3 pieces of pepperoni uses up one whole pack of pepperoni. Well…that is, minus a couple of extra pieces of pepperoni which I snack on. So if you want your pepperoni rolls fuller of pepperoni, be sure to buy two packs.
When I make these, it’s always on a Sunday. After all, we nibble on a few on Sunday afternoon. They refrigerate and re-heat for 10 seconds in the microwave so they are fantastic to take to work to eat with a salad at lunchtime.
QUICK & EASY HOMEMADE PEPPERONI ROLLS:
Ingredients:
- one batch of dough from Easy Homemade Dinner Rolls recipe
- one package pepperoni
- 8 oz shredded cheese
- 1/2 stick butter
- 2 tsp garlic powder
- 1 tsp crushed oregano
- Firstly, prepare your dough according to the Easy Homemade Dinner Rolls recipe.
- Then spray a silicone mat or baking sheet and your baking pans with non-stick cooking spray. Set the baking dishes aside for now.
- Divide the dough into 24 equal balls. Some people measure them for complete accuracy. I, on the other hand, don’t, I eyeball it.
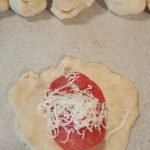
- Take each ball one at a time and press it into a circle. Take care not to rip it! It will look like a tiny little pizza. Layer on your pepperoni and cheese in the center of the circle.
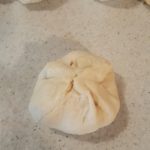
- Fold two sides together, then fold the two ends together. Lastly, pinch them closed tightly and roll them into a round shape.
- Place this little ball of love into the baking dish. I place the pinched side down in the pan. Continue this shaping until you have shaped all the pepperoni rolls.

Center pepperoni and cheese in the middle of the flattened dough.
Gently fold the two sides into the middle of the ball.
Next. fold the two ends together toward the center.
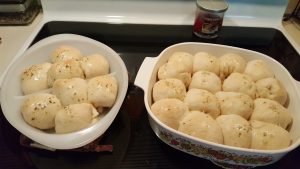
Gently pinch closed to seal and shape into a ball. Place this pinced side face down in the baking dish. - Cover the pepperoni rolls with plastic wrap. Then let them rise for 20 minutes.
- Heat your oven to 350 degrees
- After rising, slide the pepperoni balls into the oven for 25 minutes. Just before you pull them out, melt the butter, garlic powder, and oregano. I like to use my Pyrex 1 cup measuring cup and pop it in the microwave for 30 seconds. This way I can just drizzle the butter over them and not have a pastry brush to wash up. Lazy much?

- Remove the pepperoni rolls from the oven. Raise the temperature to 400 degrees. Pour a little of the butter mixture over the rolls, making sure you get a little bit of butter on each roll. Bake an additional 15 minutes.
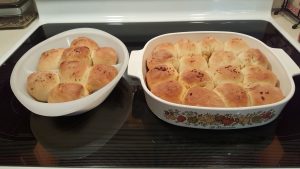
Fresh & Hot Pepperoni Rolls


When you remove these from your oven, they have a buttery, golden brown look and are soft as you bite in to them. These make two dozen, so they are great to serve when you are hosting a get together. In fact, they will certainly ask for the recipe. Please send them to me!