• Skip to main content
  • Skip to secondary menu
  • Skip to primary sidebar
  • Skip to footer
  • About Us
    • Meet Our Talented Team
    • Anti-hate Speech Policy
  • Terms Of Service
  • Free Printables
  • Advertising
  • Contact Us

DIY Home & Garden

A DIY & Gardening Resource

  • Home Page
  • DIY Projects
    • Upcycling
  • Home
    • Cleaning and Organizing
    • Holidays
      • Christmas
      • Valentine’s Day
      • Easter
      • Fourth of July
      • Halloween
      • Thanksgiving
      • Memorial Day
      • Mother’s Day
    • Home Safety
    • Home Decor
    • Pets
    • Real Estate
  • Gardening
  • Herbal and Natural Wellness
  • Recipes
    • Baking
    • Breakfast
    • Salads
    • Venison Recipes
    • Home Canning and Preserving
      • Canning
      • Dehydrating
      • Freezer Recipes
  • Travel
Home » Stop Gap DIY: Wall to Wall Desk
Stop Gap DIY: Wall to Wall Desk

Stop Gap DIY: Wall to Wall Desk

11/02/2017 By Deborah T

Love us? Share us!

My living room was a blank canvas.

I had many ideas running through my head about how I wanted to style this space. For one, I needed an office. My guest room was too small to have a desk in there. So I recognized that I would have to fit the office into my living room somehow. Additionally, I wanted to have some seating for my guests, because this is the first room that you see when you walk into my home. Naturally, I wanted it to be visually appealing. As I’m sure you can imagine, this was quite the task. So I knew I had to be creative with my design solution. This is what sparked my idea for the DIY wall-to-wall desk…

RELATED POST: 7 DIY Home Staging Hacks For Your Home

Canvassing for a new desk

My thinking behind the desk was that it would not overwhelm the limited space I had, but would still appeal to the visual senses. That being said, I wanted a rustic, live-edge desk, to add some character and style to the room; I realized it would have to be quite a long piece of live-edge wood to accommodate the length of the wall, which I knew would cost a pretty penny.

I inquired with several carpenters to see how much a desk like this would cost me, I came back with estimates upwards of $3000!!! Needless to say, that was a lot for me to invest in, and a bit of a risk as well, considering this wasn’t something I’ve seen done before, and I wasn’t certain that I would love it. That is when I decided that I would DIY this desk for a fraction of the cost. If I liked the look, only then would I invest live-edge desk later down the road when I was ready to pay up!

DIY saves the day

DIY solutions can last you a lifetime, you invest your time, energy, and money to design a real masterpiece, and it can become a staple in your home forever. I covered this in one of my previous posts, where I couldn’t find an affordable nightstand to fit my design style or budget, so I decided to make it myself (Don’t Break the Budget, DIY Instead!)

If you have a very specific vision in your mind but are having trouble finding the right piece to fit that vision or your budget, that’s where the true beauty of, what I call, ‘stop-gap’ DIY-ing comes into play. The theory behind stop-gap DIY-ing is that ‘you can try before you buy’ basically.


Now that you’re all up to speed on the method behind the madness, let’s hop right into it, and let me show you how I made my desk!


Getting ready

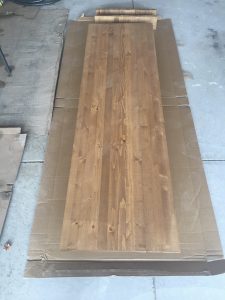
First things first, I began by measuring the distance between the two walls, I wanted the wood to be sleek and fit flush into the space without leaving any gaps. Then, I hit up my local Home Depot to find a piece of wood long enough to fit it. Just as I thought, I wouldn’t actually find a piece that was the length that I needed, so I bought two pieces of wood and had the Home Depot staff cut it down for me. I purchased the staining material and supplies, and then I headed straight home to get started on this bad boy!
thumb_IMG_9394_1024

I started by sanding down the wood completely. Moreover, I made sure there were no sharp edges or roughness to the wood. Once it was ready to stain, I brushed on a generous amount of walnut paint. Then I wiped it off with a rag. I was going for was a rustic style look. So that meant consistency and perfection at this stage was not a priority to me.

Piling up each coat

In between each coat of the stain, I let it dry completely so I could get a good idea of the colour. I didn’t want my wood to come out too dark or light. I followed the same technique with the top coat. However, I sanded it down in between each coat. This is very important because we will be using it as a desk. So we don’t want it to be rough to touch. Nor do we want it to be uncomfortable on our elbows when sitting at our desk for long periods. We want to make sure that there were no bubbles or rough patches.

Moreover, make sure you have added as many coats as you want. For example, I applied four coats to my wood because I wanted the glossy look.diy wall to wall desk prep


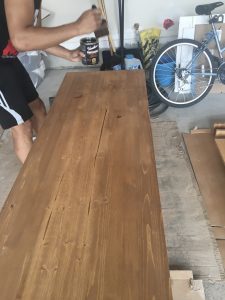
The overall cost of this desk added up to about $200.00. This included the filing cabinet, legs, wood, paint, and supplies (chairs and desktop materials not included).


Conclusion

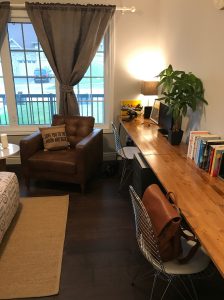
It took me two days to fully complete this project, from purchase to installation. Not too bad, if I do say so myself! Like I mentioned before, I was nervous going into it at first. This was because I wasn’t sure if I would like the style of the desk. But it came out beautifully.

I am still eyeing the live-edge tabletop, but this desk should hold me over until I’m ready to invest. PLUS it looks fabulous! I get many compliments on how this makes my front living area POP! One thing is for sure, you can never go wrong with a phenomenal, and easy DIY.

diy wall to wall desk

GUEST POST AUTHOR BIO: RDIMEN is the publisher of the Dimen Diaries blog. She lives in Toronto, Canada with her husband. She enjoys sharing any updates she makes to her new home, and any tips/tricks she’s learned along the way when it comes to designing on a budget. In addition to designing her new home, she adores sharing her lifestyle favourites and delicious recipes!

like DIY Home & Garden on Facebook
Like us on Facebook http://www.facebook.com/diyhomegardenblog
copyscape
Free banner from copyscape. Protect your work!
  • Author
  • Recent Posts
Deborah T
Deborah T
Editor and author at DIY Home & Garden, a Word Innovations publication
Deborah Tayloe is a full-time blogger, children's book author, and freelance writer, contributing to large publications.

She has a B.S.Ed. in Secondary Education/English and a Spanish Minor. In addition, she holds a Certificate in Natural Health from a fully-accredited program and is a Certified Herbologist. She pursued these natural wellness certifications due to her love for herb gardening.

Despite freelancing to make a living, her love is "all things home."

Deborah grew up in a family that grew a large vegetable garden and a fruit orchard, helping her parents pull weeds and can home-grown foods as part of her childhood. In fact, she had no idea that she could purchase veggies and fruits in pre-packed steel cans until she went to college and made a food run.

Today, she lives in Bertie County, North Carolina, an agricultural rural area with more chickens than people. She lives with her husband and two rescue pets a sweet toy fox terrier and a cat who showed up one day and moved into the house. Together, they enjoy DIY projects, furniture refinishing, gardening, and canning.
Deborah T
Latest posts by Deborah T (see all)
  • The Explosive Truth of PYREX vs. pyrex - 08/15/2023
  • Viola, Violet, and Pansy: Close Relatives But Distinct Flowers - 08/11/2023
  • Purple D’Oro Daylily: A Regal Touch of Elegance - 08/10/2023
Tweet

Filed Under: DIY Projects

About Deborah T

Deborah Tayloe is a full-time blogger, children's book author, and freelance writer, contributing to large publications.

She has a B.S.Ed. in Secondary Education/English and a Spanish Minor. In addition, she holds a Certificate in Natural Health from a fully-accredited program and is a Certified Herbologist. She pursued these natural wellness certifications due to her love for herb gardening.

Despite freelancing to make a living, her love is "all things home."

Deborah grew up in a family that grew a large vegetable garden and a fruit orchard, helping her parents pull weeds and can home-grown foods as part of her childhood. In fact, she had no idea that she could purchase veggies and fruits in pre-packed steel cans until she went to college and made a food run.

Today, she lives in Bertie County, North Carolina, an agricultural rural area with more chickens than people. She lives with her husband and two rescue pets a sweet toy fox terrier and a cat who showed up one day and moved into the house. Together, they enjoy DIY projects, furniture refinishing, gardening, and canning.

Primary Sidebar

Click for details on our latest travel deal

book vip cancun travel

Here’s Why You Should Plant Sunflowers in the Garden:

https://youtu.be/ZwvPDTbs9U0

You Won’t Even Notice You Tossed These Cluttery Things:

https://youtu.be/z16ZRMC4wbE

Don’t Suffer, Try This Bath to Soothe Itchy Skin:

https://youtu.be/SUxl9UL7QDw

Footer

Amazon Affiliate Disclaimer

DIY Home & Garden is a participant in the Amazon Services LLC Associates Program, an affiliate advertising program designed to provide a means for sites to earn advertising fees by advertising and linking to amazon.com. As an Amazon Associate I earn from qualifying purchases.

DIY Home & Garden does not constitute or intend to provide medical, health, financial, legal, or other professional advice. This website is for entertainment purposes only.

Quick Links

  • Home
  • About Us
  • Terms Of Service
  • Contact Us

Copyright © 2023 · DIY Home & Garden

We are using cookies to give you the best experience on our website.

You can find out more about which cookies we are using or switch them off in .

DIY Home & Garden
Powered by  GDPR Cookie Compliance
Privacy Overview

This website uses cookies so that we can provide you with the best user experience possible. Cookie information is stored in your browser and performs functions such as recognising you when you return to our website and helping our team to understand which sections of the website you find most interesting and useful.

Strictly Necessary Cookies

Strictly Necessary Cookie should be enabled at all times so that we can save your preferences for cookie settings.

If you disable this cookie, we will not be able to save your preferences. This means that every time you visit this website you will need to enable or disable cookies again.