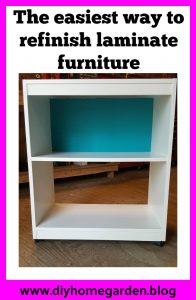
At some point, you’ve probably wondered if you can/how to refinish laminate furniture. Yes, indeed, it can be done. In fact, it’s quite easy to do!
Along the way, I think most of us have picked up a cheap piece or two of laminate furniture. You know, the kind with the fake wood or the matte white finish. It usually lasts a few months or a couple of years. Then it gets dinged up and isn’t really repairable. Or the laminate comes loose and lifts up. Or, you just want to replace it with something prettier.
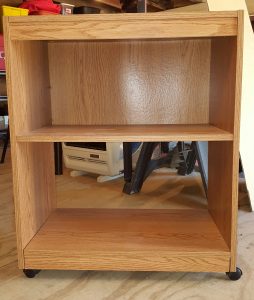
I, too, have had these pieces in my home. In fact, the microwave cart in my kitchen is a hand-me-down piece from my mother. It’s ugly but it has a lot of concealed storage space so I’ve kept it with the intention of painting it a prettier color someday.
Instead of testing out how to paint laminate furniture on a piece I plan to keep, I practiced on this piece. It’s a standard brown microwave cart, which a friend gave to me. She had planned to haul it to the trash. It was in almost perfect shape and it seemed like a good idea to give it a try.
This was a win-win. She was able to have me haul it away, and I had a practice piece.
Painting Laminate Furniture FAQs
Before we begin this laminate furniture restoration, let’s address some of the most frequently asked questions about how to paint laminate furniture.
Can laminate furniture be refinished?
Yes, yes, yes! As long as the laminated surface has not peeled or pulled away exposing the particleboard. You can paint (or stain) laminate cabinets, bookcases, tables, or any other furnishing you like.
What kind of paint do you use on laminate furniture?
You can paint laminate furniture using either of these two painting methods:
- Spray paint over laminate furniture, using a formula that will work on plastic.
- Lightly sand, apply a primer (I always use Kilz), and use a latex paint formula.
Will chalk paint stick to laminate?
Yes, it you can chalk paint laminate furniture. However, you will need to do a little bit of prep work. The surface is too slick for the paint to adhere well. Thus, you should plan to do a very light sanding, clear all dust, and apply a primer followed by chalk paint. Also, you must plan to apply a wax to seal the chalk paint.
So, while you are able to chalk paint laminate, it takes several steps to do so.
How do you resurface laminate furniture?
You can restore and give laminate furniture a new look by painting or staining. It is relatively easy once you know how to go about it.
Can you paint over laminate furniture without sanding? If so, how do you paint a laminate cabinet without sanding?
Yes — but lightly! You don’t need to remove the laminate layer. A quick scuff-sand with fine-grit sandpaper (220 grit works well) gives the primer something to grip. If you skip this step, even the best paint can peel or scratch off.
Tinyu exception. If you spray paint laminate furniture with a primer plus paint color designed for plastics, you may skip the sanding step with excellent results.
Can you sand laminate furniture?
Yes. You can lightly sand with a 150 to 220 grit sandpaper to lightly scuff the surface to prepare it for primer and latex painting. However, you must not be overly aggressive, because you do not want to erode away all the plastic and leave exposed particleboard. You are now ready for painting it a prettier color!
Will the paint peel off?
Not if you prep correctly. Sand or degloss, apply a bonding primer, then paint with a high-quality acrylic or enamel paint. Finish with a clear sealer for durability. Skipping primer is the biggest cause of peeling.
Can I stain laminate instead of painting?
Traditional wood stain won’t penetrate laminate. However, you can create a faux-stained look by using a gel stain over primer, or by painting with faux wood grain techniques.
Can you upcycle laminate furniture?
Once you learn the restoration technique, the sky’s the limit! You can reimagine any piece you find at a garage sale and have a blast doing it! Check out our article on how to turn a microwave cart into a child’s toy for some inspiration.
How can you tell the difference between laminate and veneer?
Here’s the difference between laminate and veneer. Laminate is a plastic material printed to look like wood that the manufacturer bonds to a particleboard or plywood base. On the other hand, a veneer is a super-thin piece of real wood applied instead of plastic. So if it’s plastic, you have laminate on your hands. So you will paint it like plastic. But if it’s wood covering the base, you have a veneer, which you would treat as wood.
Can you stain laminate furniture?
Yes, you can stain laminate furniture. However, you must use a gel stain formula for good results.
How to Refinish Laminate Furniture
I researched several different methods of refinishing laminate furniture and settled on a method that combined spray painting and rolling paint.
Here’s how I did it.
Before you start, gather your painting supplies:
- Paint roller cover
- Paint roller handle00000000000000000000
- Plastic paint tray to pick up paint on the roller
- Kilz Primer (I used the Original formula)
- Latex paint in your color choice
- Fabric and to cover the back board (or you can remove your backer if you prefer an open shelf)
- Elmers Craft Bond adhesive spray in an aerosol can (to attach the fabric)
Grab a Few Essential Tools, as Well:
- Screwdriver / drill
- Sandpaper or sanding block (120, 220 grit)
- Deglosser / liquid sandpaper (for tricky surfaces)
- Tack cloth/microfiber cloth
- Drop cloth, painter’s tape, gloves, mask
The product links in the above sections are my Amazon associate links. If you purchase supplies using them, I make a small commission but at no additional cost to you! These fees help me maintain DIY Home & Garden. Needless to say, they are very much appreciated!
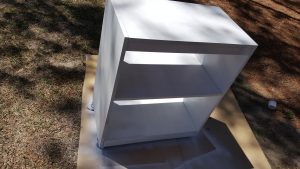
Step one: Prep and Prime the Furnishing
Before you can start painting, you must clean any debris or oil away from the piece so that the paint will stick. I also used pliers to pull the staples out when I removed the backboard piece that’s behind the top shelf. It was surprisingly in perfect condition. I used that as an opportunity to add a little splash of teal. I also taped off the casters. You can remove them, but meh.
Most DIYers don’t realize prep is 80% of the project. Add a few more details:
- Degreasing first: Wipe down with TSP substitute or vinegar-water before sanding.
- Repairing chips: Fill dents or chips with wood filler, then sand smooth.
- Scuff sanding: Even though laminate isn’t “wood,” lightly sanding improves adhesion.
- Dust removal: Use the microfiber cloth or tackcloth to give the piece a good wipe-down.
What is the best paint for laminate furniture?
I used Krylon Fusion White Spray Paint Primer. The Krylon Fusion line is safe for plastics, which is what you need for painting laminate furniture. It took two coats to cover this, which was about a can and a half of primer. This brand is my go-to. It is literally the only one I found to work reliably and consistently. You can pick it up at almost any hardware retailers, and you’ll find it competitively priced.
Choosing your primer color
When you’re looking at primers, they usually come in white, gray, or black. I always choose white for pieces that I plan to paint white or bright colors. This choice will create a perfect blank canvas and make the colors appear brighter. I keep a black primer for projects that I’m painting darker and save gray primer for metallic finishes.
You can choose how you want, but this is a rule of thumb that I follow regardless of what type of project I’m painting.
Step Two: Cover the Backer Board with Fabric (it does not take paint)
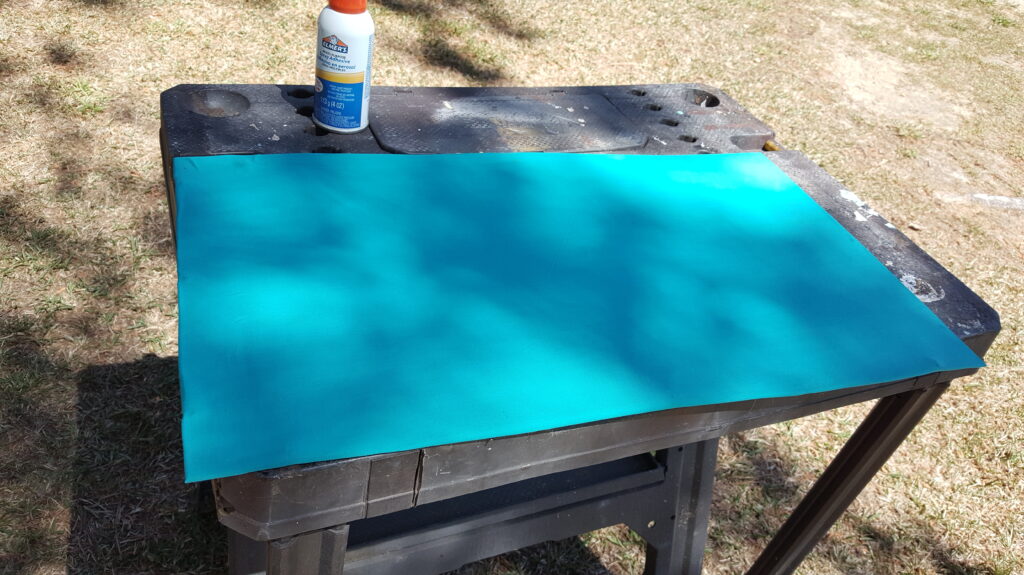
While my primer dried, I turned my attention to the backer board that I salvaged. On closer inspection, I saw it had several little cracks. It was still sturdy, so I decided to cover it up to save it. It gave stability to the cart. Once I removed it, the little cart was quite wobbly.
These backing pieces are often little more than cardboard. They don’t accept paint evenly. The best way to refinish this part of the laminate furniture is to cover it with colorful fabric. This opportunity adds color, style, and texture. As a second option, you can remove it altogether, but I wanted to add it.
If the back of your project is hidden, you can skip this step. However, mine showed through.
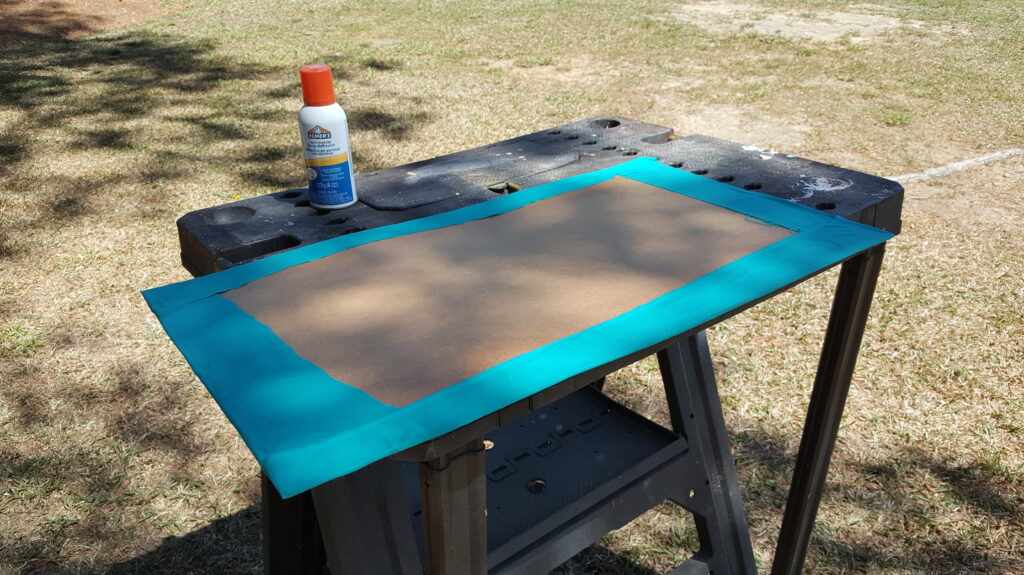
I cut a piece of fabric down to have about 3″ of overhang around the back of the board. By the way, iron the fabric first! I didn’t and I now have a little wrinkle permanently attached. Oh well, live and learn.
Apply a gentle mist of spray adhesive and let it set up for about three minutes. starting at the middle of the front, quickly smooth out the fabric all the way around. Flip to the back, and fold the corners like it’s a present. Spray it down with more spray adhesive.
When using the spray adhesive, I prefer to work outside so I don’t overspray onto anything that I don’t want sticky. Plus, it’s stinky. Outside’s definitely best!
Step Three: Roll on the Paint
Because my hubby is a very neat painter, he takes often over finish work for me. He used a foam roller and rolled on a satin finish paint. We started to use a flat finish paint, testing in an inconspicuous place. It didn’t look very good, as it seemed to show off fine scratches and imperfections in this old piece. We switched to a satin finish paint. Fortunately, it gripped well to the primer. In fact, it rolled on and dried beautifully, hiding the scars and imperfect spots. He painted two coats of paint to get a fantastic finish.
We decided to go with Valspar’s Fossil White which we had bought at our local Ace Hardware store. We had it on hand. I knew the creamy white and teal would look stunning together, so we went with it.
After the paint dried, I also untaped the casters.
Step Four: Reattach the Back Piece to Your Project
After the paint dried, my husband helped me reattach the backer board with small nails.
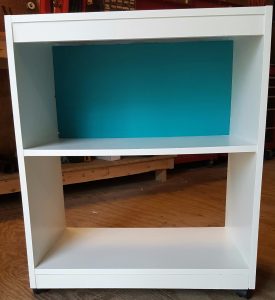
I really didn’t have any use for this cart. Honestly, I wanted to make a tutorial for this blog, and it seemed like a fun project. So instead of keeping it, I gave it to a friend who teaches school. She’s always looking for affordable or free pieces like this one to use in her classroom. She intends to use it for a media cart. She’s really pleased with it because the casters make it easy to move around, it’s wipeable, and sturdy again. I hope she can use this piece for years to come.
So now you know. You can paint laminate furniture! Save money by updating those old storage pieces around your home instead of replacing them.