This nightstand refinishing and repurposing project is a long time in the making. My hubby and I actually crafted this piece in October 2019 as a gift for a special child in our lives. Somehow, the images I snapped ended up on my “camera roll,” forgotten about until now! It seems like such a long time ago. Regardless, that’s why some people say “better late than never.” When I stumbled onto these pictures this weekend, I was delighted, to say the least!
We had an old nightstand to remove from the spare bedroom, which I converted into my home office. It was in good condition, solid pinewood–not particleboard or cheap laminate. While I sold or gave away most of the pieces, we knew we had a special birthday upcoming. So we decided to create something fun with this piece instead of selling it.
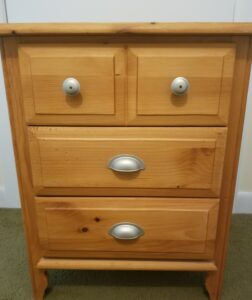
Here is what the plain three-drawer, basic nightstand looked like before we gave it some TLC.

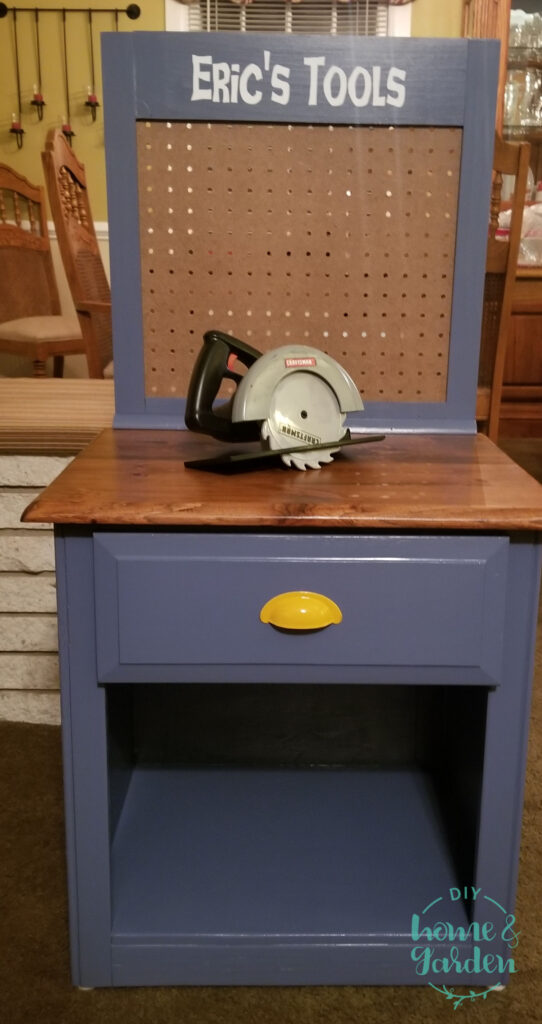
And this is what the finished product looked like at the end of our furniture rehab:

How to Upcycle an Old Nightstand Into a Child’s “Workbench”
Here are the basic steps that we followed to reimagine this simple nightstand into an amazing toy.
-
-
-
- We removed all the hardware and drawers and stripped the stain.
- This was a three-drawer unit. Although the top drawer in the “before” image looks like two separate, it was not. To give this the appearance of a workbench, we cut out the bottom two drawers. We saved two of the drawers for another project and chose the drawer that was in the best condition to serve as the “tool drawer” of this child’s tool bench.
- We stained the top of the recycled nightstand with a medium finish and painted the rest a nice denim blue–it took primer and two coats. Because we were uncertain of the color of his bedroom, we settled on this blue as a nice neutral.
- Every tool bench needs a pegboard, even a child’s workbench! So we purchased a piece of pegboard and measured it to the same width as the nightstand.
- Here’s where a few power tools got put into use. I.e., the fun stuff. We used scrap wood to create a frame and support system for the pegboard, painting it in the same blue color. We mounted it as shown below. It is nice and secure and sturdy. We took care not to make it too tall, because it would have been top-heavy and a tipping hazard. We also cut vinyl letters with the boy’s name, just for fun.
- We spray-painted one of the original nightstand drawers handles a contrasting bright yellow for a fun pop of color that a toddler would love and reattached it.
- As a final touch, we put little slider feet on the bottom for easy movement when mom cleans behind and around the piece. The pegboard made it somewhat heavy.
-
-
The Takeaway: With Time and Creativity You Can Repurpose Old Furniture
TA-DA… Done! This gift was a HUGE hit with this child and his mother. We knew this little one had lots of “tools” already, so we included only the toy saw. We also gave mom several hooks to hang his toolkit pieces from the pegboard, letting her make the call on whether he was mature enough for them–and she allowed this without any issue. I suppose that all depends on the child, though.
DIY Home & Garden has long advocated for recycling and repurposing furniture whenever it’s possible. Furnishings are so costly. Besides that, the makeovers are fun and challenging. Besides using a nightstand to create a children’s toolbench, you would utilize an old microwave cart or utility cart to achieve a similar outcome. Please connect with us on social media to give us feedback, thoughts, or opinions. Indeed, we always welcome input. So until the next article, have a happy DIY day.

