A flower bed is one of the easiest ways to add a new colorful look to your garden. Plants harness nature and bring it to your living area. The beauty of blooming flowers, stunning roses, and delicate butterflies simply boosts your outdoor surroundings, and the fragrance of them gives you peace of soul.
But how to build a flower bed from scratch? This step-by-step guide will show you!
Step 1: Choose the Right Location
When it comes to planting, location is the first thing that you should take into account. No matter how small or large your flower bed is going to be, make sure it’ll expose enough direct sunlight throughout the day, especially in the morning. Otherwise, some plants (like coneflower, sunflower, lily, and coreopsis) might not be able to bloom.
Although sunlight is essential for flowering plants to grow and flourish, too much of it can damage your plants and their flowers. A large tree with extensive shade about 5 feet away from your bed is ideal for that reason.
Additionally, you should avoid areas where water stands or steep slope exists.
Step 2: Make a Sketch of Your Flower Bed
Before you start digging your garden, you should know exactly what you’re going to do. This step gives you the chance to play around with ideas, such as your flower bed’s size and shape. You can draw a scheme on paper or on the ground with a sharp stick.
A medium rectangular garden bed could be about 30 square feet, particularly, 10 feet in length and 3 feet in width. It offers enough room for around 20 to 30 plants, maybe two kinds of perennials and four kinds of annuals. The bed’s border should not exceed 4 inches wide and 12 inches high for a neat garden look. To maximize the sunlight, you should orient the bed in an east-west direction.
Step 3: Build the Bed Frame
When it comes to raised flower beds, you have two options: either buy the kits or build them yourself from scratch. The first choice is fairly simple, and if you’ve ever stacked Legos, you will have no trouble with it. Simply lay all the pieces out, put the corner pieces in, and start sliding the boards to put together a
The first choice is fairly simple, and if you’ve ever stacked Legos, you will have no trouble with it. Simply lay all the pieces out, put the corner pieces in, and start sliding the boards to put together a raised bed.
If you want to actually build your own flower bed with the wood, make sure you have enough materials and tools to work with. In particular, you’ll need four 4’’× 4’’× 8’’ timbers, a saw, a pencil, a tape measure, and spikes. You may need either several nails and a hammer, or some screws and a drill.
For more details, you can check this video:
Step 4: Remove Grass and Weeds

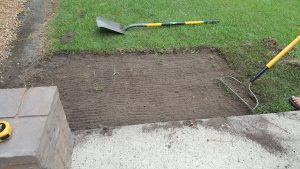
If the location where you plan to set up your flower bed is the habitat of weeds or grass, you should eliminate all of them. Instead of rooting up the sod, use a flat shovel to dig around their roots, then carefully lift them out. Using herbicides is another way, but I don’t recommend this because herbicides are not environmentally friendly.
Step 5: Amend the Soil
No plants can thrive at optimal rates if the earth beneath them is poor. Therefore, modifying the soil before planting is crucial.
For the best start, go to the store and buy organic fertilizer. A mix of 1/2 compost and 1/2 screened topsoil provides enough nutrients and minerals for your plant growing. It’s also well-draining and moisture-retentive. For the higher nutritional value, you can mix 3-5 different sources of compost. For example, create a mix of 1/4 vermiculite, 1/4 peat moss, 1/4 cotton burrs, and 1/4 chicken manure.
While a soil test is not strictly required, it plays an important role in the growth of plants. To conduct this test, you’ll need a tool called soil pH meter which is designed to measure the level of the acidity or basicity in the soil. So, you can find out whether your soil is healthy or not.
Step 6: Seed or Grow the Plants
When choosing flowering plants, you should pick up a variety of them, especially the ones that bloom at different seasons of the year. This way, you can keep your flower bed always in bloom, almost all year round.
Prioritize your plants based on their height, space, and color. A simple thumb rule is to place smaller plants in the front of the bed and taller ones in the back. Make sure the soil around them are firm. For easy adjustments, you should start with extra space and leave it later.
To make your flower bed look more professional, you can consider layering ornamental grasses such as Zebra Grass or New Zealand Flax.
Final Thoughts
A flower bed might need several months to look gorgeous. Throughout this time and later, watering and maintaining are indispensable parts of the process. One easy way to help your achievement look beautiful all year round is cutting the plants back seasonally after blooming, and don’t forget to leave a few inches for the newbie.
If you have any questions or contributions, feel free to connect with us on social media. We have pages on Mewe and Facebook. Until we see you the next time, have a happy DIY day!

