• Skip to main content
  • Skip to secondary menu
  • Skip to primary sidebar
  • Skip to footer
  • About Us
    • Meet Our Talented Team
    • Anti-hate Speech Policy
  • Terms Of Service
  • Free Printables
  • Advertising
  • Contact Us

DIY Home & Garden

A DIY & Gardening Resource

  • Home Page
  • DIY Projects
    • Upcycling
  • Home
    • Cleaning and Organizing
    • Holidays
      • Christmas
      • Valentine’s Day
      • Easter
      • Fourth of July
      • Halloween
      • Thanksgiving
      • Memorial Day
      • Mother’s Day
    • Home Safety
    • Home Decor
    • Pets
    • Real Estate
  • Gardening
  • Herbal and Natural Wellness
  • Recipes
    • Baking
    • Breakfast
    • Salads
    • Venison Recipes
    • Home Canning and Preserving
      • Canning
      • Dehydrating
      • Freezer Recipes
  • Travel
Home » DIY How To Upcycle A Picture Frame Into An Earring Rack
DIY How To Upcycle A Picture Frame Into An Earring Rack

DIY How To Upcycle A Picture Frame Into An Earring Rack

07/20/2017 By Deborah T

Love us? Share us!

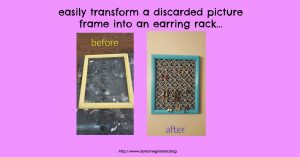
I have seen this project on many sites. But I never could find a step by step DIY on how to upcycle a picture frame into an earring rack tutorial. So I searched for directions, but couldn’t find them. That’s when I took matters into my own hands. I found an old frame, headed out to my shop, and figured it out, taking a few photos along the way.

RELATED POST: Upcycled: 5 Easy Upcycles With Common Household Items

I have long wanted one of these little earring racks to hang on the wall near my bathroom vanity. I tend to clutter all my vanity drawer space by tossing earrings in. Then, I wonder why I can’t find them. I have a small home and we need to make all our storage space count! This seems like a great way to take advantage of vertical storage space.

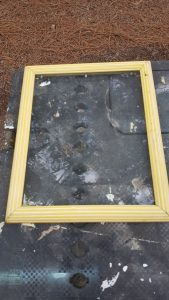
I had an old and ugly yellow wooden picture frame with years of dust from the attic. But I don’t really even know where it came from, I just always had it. Actually, I kind of think I picked it up at a yard sale with some intention that never panned out. It was in decent condition, but very dirty to say the least.

It looked like this, with years of dust and grime. Although I will admit, the paint splatters were on my work table, that’s just background.  I paint on this table all the time as you can see!

picture frame upcycled
This wood picture frame was painted yellow and grimy with dirt from the attic.

STEP ONE: CLEAN AND PREP

I spent a few minutes taking the glass out, cleaning it, and used a brush to clean all the dust and dirt out of the grooves in the frame. I then used the air hose to blow out any remaining debris. Don’t ever spray paint over dust, cobwebs, etc. or you won’t be happy with the end result. A clean surface is always the best surface to paint on!

Don’t ever spray paint over dust, cobwebs, etc. or you won’t be happy with the end result. A clean surface is always the best surface to paint on!

upcycle photo frame
Took the glass out of the mirror and gave both the frame and glass a good cleaning. No point in upcycling a photo frame if it’s dirty!

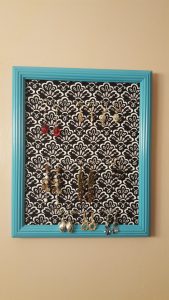
STEP TWO: TWO COATS OF SPRAY PAINT

I applied two coats of  Valspar’s Project Perfect Spray Paint in Exotic Sea, a fun and bright blue. It will add a fun, vibrant pop of color to the wall.  I applied one coat and let it dry for about 10 minutes. I applied the second coat, then left it alone to dry very well.

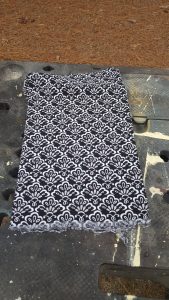
STEP THREE: ADD A FABRIC BACKGROUND

While I was in between coats of spray paint, I turned attention to the glass piece, which became the backer for my earring rack. I found a scrap of fabric I had from when I reupholstered the chair next to my back door. I sat it over the glass plate that I had removed. Then I cleaned and eyeballed how much fabric I needed. I cut down the fabric to size.

Then, I applied spray adhesive to the glass. I laid the fabric down very carefully…and straight! Using a scraper, I gently pushed out all air pockets, and wrinkles and let it dry for about 15 minutes.  After it was dry, I flipped it over and folded over the corners like I was wrapping a present and tacked it all down with spray adhesive.

photo frame earring rack
Lie the fabric over the glass and roughly cut it down to it’s easier to work with. Leave space to fold the corners in on the back.

AT THIS POINT, I QUIT FOR THE DAY AND LET THE PAINT AND GLUE ALL DRY OVERNIGHT!  YOU NEED TO FLIP THE FRAME FACE DOWN TO FINISH. YOU DON”T WANT TO MUCK UP YOUR PAINT JOB!

STEP FOUR: ADD THE EARRING RACKS

Instead of wire stretched across my earring holder, I did my own spin on the racks of the earring holder. Also I used clear colored Stretch Magic jewelry cord. This is because I liked the idea of the earrings kind of suspending from the clear cord.

I cut three pieces of Stretch Magic cord to length and stapled them to the back of the frame. I left plenty of “clearance” to put the fabric-covered backing on without pinching them or making them too tight.

STEP FIVE: ADD THE FABRIC PIECE INTO THE FRAME

Finally, I the fabric-covered glass and carefully worked it into the frame. This particular frame didn’t have a cardboard backer, but it would have been easier to work with than the glass. I think all DIY’ers and crafters know, though, that we work with what we have!

This is a quick, easy and fun project. I think that I made all the pieces in under 20 minutes. Re-assembling the parts the next day took about 5 minutes. In fact, I think that I have found a Christmas present to make for a few special people! I will enjoy using this earring holder every day and finally clearing the clutter out of my vanity!

finished earring rack
Earring rack upcycled from picture frame…done!

As always, please share comments or email me at diyhomegardenblog@gmail.com with photos of your own take on this project. Have a happy DIY day!

like DIY Home & Garden on Facebook
Like us on Facebook
photo frame upcycle
Earring rack upcycled from a photo frame, before and after.


  • Author
  • Recent Posts
Deborah T
Deborah T
Editor and author at DIY Home & Garden, a Word Innovations publication
Deborah Tayloe is a full-time blogger, children's book author, and freelance writer, contributing to large publications.

She has a B.S.Ed. in Secondary Education/English and a Spanish Minor. In addition, she holds a Certificate in Natural Health from a fully-accredited program and is a Certified Herbologist. She pursued these natural wellness certifications due to her love for herb gardening.

Despite freelancing to make a living, her love is "all things home."

Deborah grew up in a family that grew a large vegetable garden and a fruit orchard, helping her parents pull weeds and can home-grown foods as part of her childhood. In fact, she had no idea that she could purchase veggies and fruits in pre-packed steel cans until she went to college and made a food run.

Today, she lives in Bertie County, North Carolina, an agricultural rural area with more chickens than people. She lives with her husband and two rescue pets a sweet toy fox terrier and a cat who showed up one day and moved into the house. Together, they enjoy DIY projects, furniture refinishing, gardening, and canning.
Deborah T
Latest posts by Deborah T (see all)
  • The Explosive Truth of PYREX vs. pyrex - 08/15/2023
  • Viola, Violet, and Pansy: Close Relatives But Distinct Flowers - 08/11/2023
  • Purple D’Oro Daylily: A Regal Touch of Elegance - 08/10/2023
Tweet

Filed Under: Upcycling Tagged With: DIY, diy earring rack, earring holder, earring rack, spray paint project, spray painting, upcycle, upcycled, upcycled earring rack, upcycled photo frame

About Deborah T

Deborah Tayloe is a full-time blogger, children's book author, and freelance writer, contributing to large publications.

She has a B.S.Ed. in Secondary Education/English and a Spanish Minor. In addition, she holds a Certificate in Natural Health from a fully-accredited program and is a Certified Herbologist. She pursued these natural wellness certifications due to her love for herb gardening.

Despite freelancing to make a living, her love is "all things home."

Deborah grew up in a family that grew a large vegetable garden and a fruit orchard, helping her parents pull weeds and can home-grown foods as part of her childhood. In fact, she had no idea that she could purchase veggies and fruits in pre-packed steel cans until she went to college and made a food run.

Today, she lives in Bertie County, North Carolina, an agricultural rural area with more chickens than people. She lives with her husband and two rescue pets a sweet toy fox terrier and a cat who showed up one day and moved into the house. Together, they enjoy DIY projects, furniture refinishing, gardening, and canning.

Primary Sidebar

Click for details on our latest travel deal

book vip cancun travel

Here’s Why You Should Plant Sunflowers in the Garden:

https://youtu.be/ZwvPDTbs9U0

You Won’t Even Notice You Tossed These Cluttery Things:

https://youtu.be/z16ZRMC4wbE

Don’t Suffer, Try This Bath to Soothe Itchy Skin:

https://youtu.be/SUxl9UL7QDw

Footer

Amazon Affiliate Disclaimer

DIY Home & Garden is a participant in the Amazon Services LLC Associates Program, an affiliate advertising program designed to provide a means for sites to earn advertising fees by advertising and linking to amazon.com. As an Amazon Associate I earn from qualifying purchases.

DIY Home & Garden does not constitute or intend to provide medical, health, financial, legal, or other professional advice. This website is for entertainment purposes only.

Quick Links

  • Home
  • About Us
  • Terms Of Service
  • Contact Us

Copyright © 2023 · DIY Home & Garden

We are using cookies to give you the best experience on our website.

You can find out more about which cookies we are using or switch them off in .

DIY Home & Garden
Powered by  GDPR Cookie Compliance
Privacy Overview

This website uses cookies so that we can provide you with the best user experience possible. Cookie information is stored in your browser and performs functions such as recognising you when you return to our website and helping our team to understand which sections of the website you find most interesting and useful.

Strictly Necessary Cookies

Strictly Necessary Cookie should be enabled at all times so that we can save your preferences for cookie settings.

If you disable this cookie, we will not be able to save your preferences. This means that every time you visit this website you will need to enable or disable cookies again.