The Euro Cylinder lock uses a pin tumbler system that uses pins of different lengths to prevent a lock from opening without the correct key. Inventors originally patented this lock type in 1805 in an attempt by European locksmiths to standardize locks.
You will find Euro cylinders used all over the world and are very prevalent in the UK and Europe and are a common sight on both residential and commercial properties. In the United States, people choose these primarily on sliding glass doors and internal doors.
Euro cylinders are probably one of the easiest locks to replace, primarily due to the cylinder being self-contained, and their wide availability, the whole process can take as little as 5 minutes. So there is no need to call out an expensive locksmith or handyman. One of the most important aspects of changing a euro cylinder is in the preparation.
To Change A Euro Cylinder You Will Require
- 1 Torx or 1 Phillips Screwdriver (depending on the screw type)
- 1 Euro Cylinder Lock (Do NOT BUY before you have extracted the lock as you need the correct size)
- Your existing Euro cylinder key
Step by step Guide to Changing a Euro Cylinder Lock
Step One:
The first step is to open the door, so you can comfortably stand by the side of it.
Step Two:
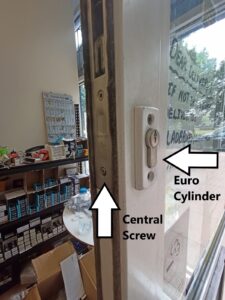
Next, you will need to locate the euro cylinder central screw. This is the screw that keeps the euro cylinder in place within the door. This can be found at the side of the door where the euro cylinder is located.
Step Three:
Once you have located the central screw you will need to use the appropriate screwdriver to remove the screw. This is typically a Phillip’s head but may also be a Torx and sometimes very rarely a flat head.
Step Four:
Once you remove the screw, insert your key into the lock and turn the keys approximately 1/8th of the way around or to 2 O’clock. You will align the cam (middle part of lock). Once you line the up, you will need to pull the key and wiggle the lock out of the door. This can be tricky and frustrating but do not worry, all it is is an alignment issue. If you have a door handle you may need to loosen the handle using the screws in order to remove the euro cylinder, however, this is usually not required.
Step Five:
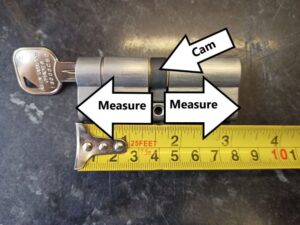
Once you have successfully removed the euro cylinder, the next step is to measure it. You can measure a euro cylinder by grabbing a measuring tape and measuring from the end of the cylinder to the central screw-hole, you will need to repeat this for both sides. You will need to remember which side of the lock is located internally and which side is located externally.
Your measurement should be something like 40mm by 40mm (As seen below) or 45mm by 50mm etc. However, this size is only correct if your lock is the correct size for the door in the first place. In many cases previous installers fitted it with the wrong size lock, potentially causing a security vulnerability known as lock snapping. However, we will discuss this more later in the article.
The cylinder should be flush to the door with none of the cylinders being exposed. If you see exposed cylinder, then measure from the central screw hole to where the lock would fit flush to the door, this should be identifiable with a weathered line on the lock, where some of the unit has been exposed to the elements.
Measuring the size correctly is very important, there are approximately 25 different sizes so ensure you measure correctly. Alternatively, you could if possible take the lock with you to your local hardware store or locksmiths to ensure you purchase the correct size.
Now travel to your local hardware store or locksmiths and purchase the required cylinder.
Step Six:
Once you have the new euro cylinder you will need to take the steps we mentioned earlier but in reverse. So grab your new lock and insert the new keys into it turning the lock 1/8th of the way around or to approximately 2 O’clock, once the cam is aligned insert the lock into the door while ensuring the lock is in the correct way round. This bit can be as tricky as getting the lock out, remember it’s just an alignment issue so don’t panic.
Step Seven:
Once the lock is fitted nicely and flush to the door use your old screw which you removed and screw into the central screw-hole and tighten. We recommend using your old screw as this is already the correct size. You might need to cut a new screw to size. However, If the new screw is the same size and doesn’t require cutting, we recommend using the new screw. Don’t forget to keep your cylinder measurement for future maintenance needs.
Step Eight:
Now it’s time to test. Firstly lift the handle and turn the key to lock the door without actually shutting the door, repeat this a number of times. Once you have seen this working a number of times it should be safe to shut the door and lock it.
Euro Cylinders are one of the most prevalent locks on the market and possess both strengths and weaknesses.
 Weaknesses:
- Lock Snapping – One of the biggest vulnerabilities of euro cylinders is lock snapping. This is exactly what it sounds like and literally involves snapping the lock in two. You can perform this step in as little as 15 seconds and by commonly used tools that you can buy at any hardware store.
- Vulnerability to drilling – Like all locks, they are vulnerable to drilling especially cheap lock euro cylinders. Manufacturers produce cheaper models out of weaker materials and do not incorporate the protective measures found in higher security cylinders.
Strengths:
- Hard to pick – one of the main reasons the euro cylinder has become so widely used is their difficulty to pick. However, as we have seen time after time criminals do not usually even attempt to pick locks.
- Standardization and ease of replacing – Euro cylinder locks feature standard sizes. And, as mentioned before, you can change them out quickly and easily. You do not need previous knowledge or experience to do so, just a handy how-to guide like this one.
- Can be tough – Despite all of the euro cylinders vulnerabilities, over time they have been overcome with innovative construction techniques and making use of stronger materials. Generally the more expensive a euro cylinder the higher the level of protection. These higher security euro cylinders may contain the following
- Anti Drill Pins – Anti-drill pins located within the lock prevent drilling. While these do not really prevent drilling they do make the process harder and much more time-consuming.
- Anti Bump Pins – Anti bump pins reside within the locking mechanism to stop a successful bump attempt. Burping involves using a specially designed key to transmit a slight impact to all pins within the lock, the force used drives the pins while the keys hold the pins in place.
- Sacrificial Section – Sacrificial sections will break off during a lock snapping attempt. When this section breaks off it will leave the rest of the lock within the door safe from another snapping attempt.
- Magnets – Some locks have a magnetically operated locking system which requires a magnet on the key in order to turn the lock, this greatly increases the difficulty in picking and bumping the lock.
The Takeaway on Euro Cylinder Locks
If your euro cylinder is for an external door we highly recommend purchasing a high-security lock as these will be much more resistant to bypassing techniques used by criminals. More on this and other useful security tips and advice can be found on ITCC Locksmiths blog section.
This blog was written by Callan Wells-Raynes at ITCC Locksmiths. A London based locksmith company with over 12 years of experience, specializing in UPVC and Composite door opening and repair.


 Weaknesses: