Start sublimating t-shirts, tumblers, and more with our guide.
If you’ve been hanging with me here at DIY Home & Garden Blog for a while, you know I’m a serial entrepreneur. From co-owning a lawn care business with my husband to launching Dart Custom Printing and Dart Devotionals on Etsy, I’ve always got a project brewing. Over the past five years, I’ve jumped headfirst into sublimation printing — and let me tell you, it’s a game-changer for crafters, homesteaders, and small business owners.
Whether you want to create custom t-shirts for your family reunion, personalized mugs as gifts, or launch your own sublimation business, this guide will walk you through everything you need to know.
Let’s dive in!
What Is Sublimation Printing?
Sublimation printing is a process that uses heat and pressure to turn special ink into gas, which bonds permanently with polyester fabric or poly-coated surfaces. Unlike vinyl or screen printing, the design becomes part of the item itself — so it never peels, cracks, or fades.
Think of it like tattooing your design right into the fibers or coating. The result? Vibrant, professional-quality prints you can do right at home.
How Does Sublimation Printing Work?
Here’s the science made simple:
- Print the Design → Using sublimation ink on sublimation paper.
- Prep the Blank → Polyester fabric or poly-coated item.
- Apply Heat → A press at 350–400°F transfers the ink as gas.
- Bonding → The gas fuses permanently with the blank.
- Cool & Reveal → The design is now part of the item — soft, durable, and vibrant.
Because the design infuses instead of sitting on top, sublimation projects can last for years without cracking or washing away.
What You Need to Get Started with Sublimation Printing
Starting doesn’t require a full print shop — just the right essentials:
- Sublimation printer (Sawgrass or converted Epson EcoTank)
- Sublimation ink (never regular inkjet ink)
- Sublimation paper
- Heat press (flat press for shirts, mug/tumbler press for drinkware)
- Sublimation blanks (shirts, mugs, tumblers, coasters, ornaments)
- Design software (Canva, Photoshop, Cricut Design Space)
- Supplies (heat tape, butcher paper, lint roller, gloves)
Setting Up Your Workspace
Safety and organization matter:
- Work in a ventilated area (fans or windows open).
- Use a heat-resistant surface for your press.
- Plug presses into a dedicated outlet — don’t overload.
- Keep butcher paper, tape, and gloves nearby.
- Dedicate ovens used for sublimation to crafting only (never food).
A smart setup keeps you safe and makes projects smoother.
Best Materials for Sublimation Printing
Not all blanks are created equal. Here’s what works — and what doesn’t:
Best Options:
- Polyester shirts (65–100%) in light colors.
- Poly-coated mugs and tumblers.
- Neoprene coasters, mousepads, keychains.
- Aluminum photo panels and MDF ornaments.
Avoid:
- 100% cotton (won’t bond).
- Dark fabrics (no white ink in sublimation).
- Uncoated ceramic, glass, or metal.
Always buy blanks labeled “sublimation-ready” for best results.
Step-by-Step: Your First Sublimation T-Shirt Project
Ready to try it? A t-shirt is the perfect beginner project.
- Gather supplies → shirt (65–100% polyester), sublimation print, tape, butcher paper, lint roller, heat press.
- Design in Canva → bold text and graphics at 300 DPI, mirrored before printing.
- Print → use sublimation paper, high-quality setting.
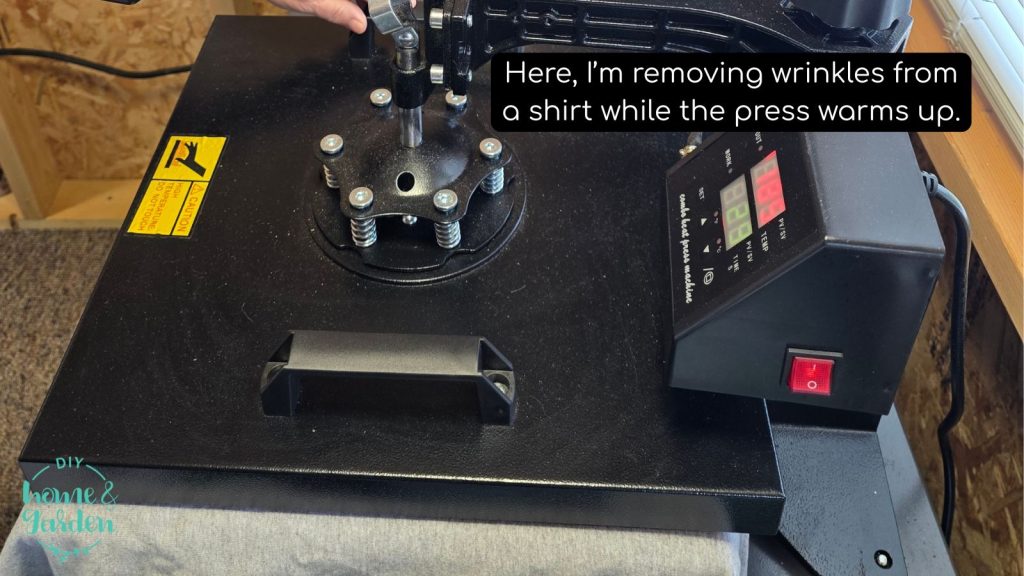
- Prep shirt → lint roll, pre-press 5 seconds, place butcher paper inside.
- Position design → face down, tape edges.
- Press → 400°F, medium pressure, 60 seconds.
- Reveal → peel while warm, let cool.
💡 Don’t forget: always mirror your design — otherwise it’ll come out backward!
Top Sublimation Mistakes (and How to Fix Them)
- Forgot to mirror? → Always flip before printing.
- Dull colors? → Use high-poly fabrics and correct temps.
- Ghosting/shadows? → Secure with heat tape.
- Lines in print? → Run nozzle check and head cleaning.
- Blue specks? → Always lint roll and pre-press.
- Blurry edges? → Lower press time or upgrade paper.
- Scorch marks? → Use Teflon sheet, reduce pressure.
- No transfer? → Blank isn’t sublimation-ready.
- Uneven mugs? → Use proper mug press or wrap.
- Paper sticks? → Lower pressure, pre-press blanks.
Troubleshooting is part of the learning curve — don’t give up! It does take some practice. I learned by watching countless YouTube videos and tutorials, then trying. I destroyed a bunch of stuff at first, either by not pressing long enough, overcorrecting and scorching, and by applying too little pressure (there’s a handy adjustment knob on the press, said nobody to me!)
Tip: I found it helpful to purchase some inexpensive polyester socks to try pressing techniques. Even if I blooped them, I could still wear them – nobody would see them inside shoes.
Designing for Sublimation (Even If You’re Not a Graphic Designer)
- Use PNG files at 300 DPI for best results.
- Size artwork to your blank (shirts ~8.5×11, mugs ~8.5×3.5).
- Canva is beginner-friendly; Photoshop/Affinity are pro tools.
- Use bold fonts, bright or dark colors, and high contrast.
- Avoid tiny text or thin lines that may blur.
- Sources for designs: Creative Fabrica, Design Bundles, Etsy PNG images.
💡 Pro tip: Even if you buy a premade PNG, customize it with your own text or quote for a unique touch.
Below is a quick Reel I made showing an original design I created in Canva, then sublimated on a t-shirt as a door prize for my local senior center’s annual expo:
Sublimation Safety Tips
- Always use heat-resistant gloves for mugs/tumblers.
- Ventilate your workspace — open windows, use a fan.
- Never reuse a kitchen oven for sublimation.
- Keep kids and pets out during pressing.
- Unplug equipment after use.
- Store inks and paper in cool, dry areas.
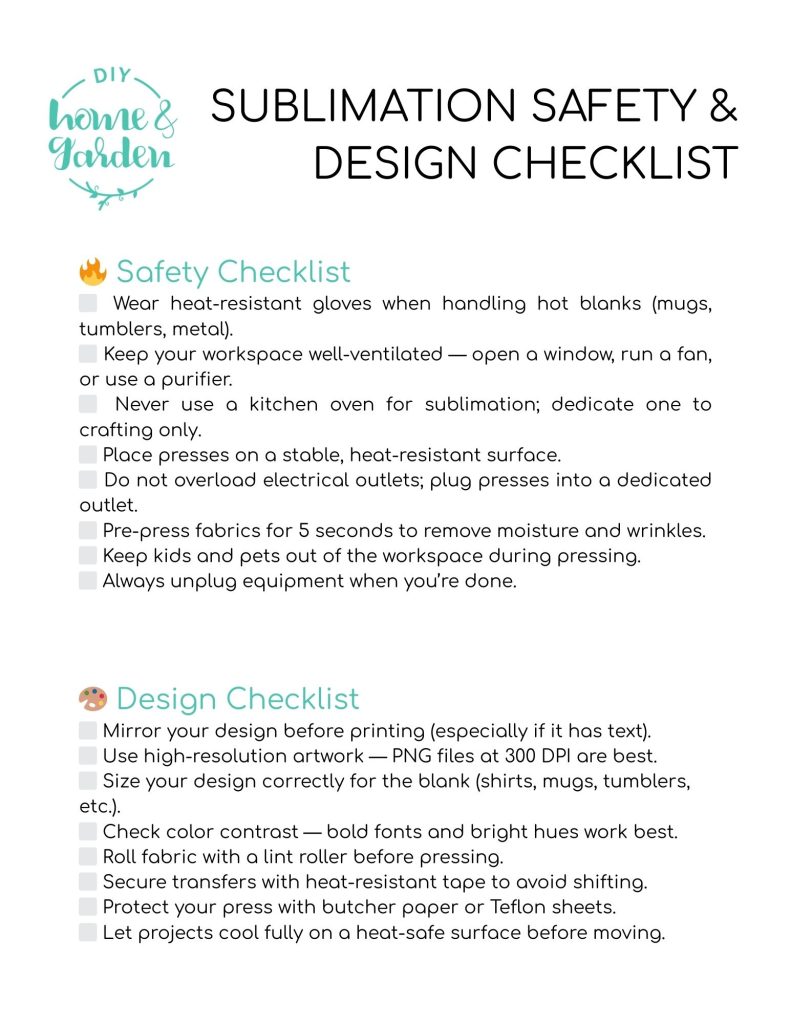
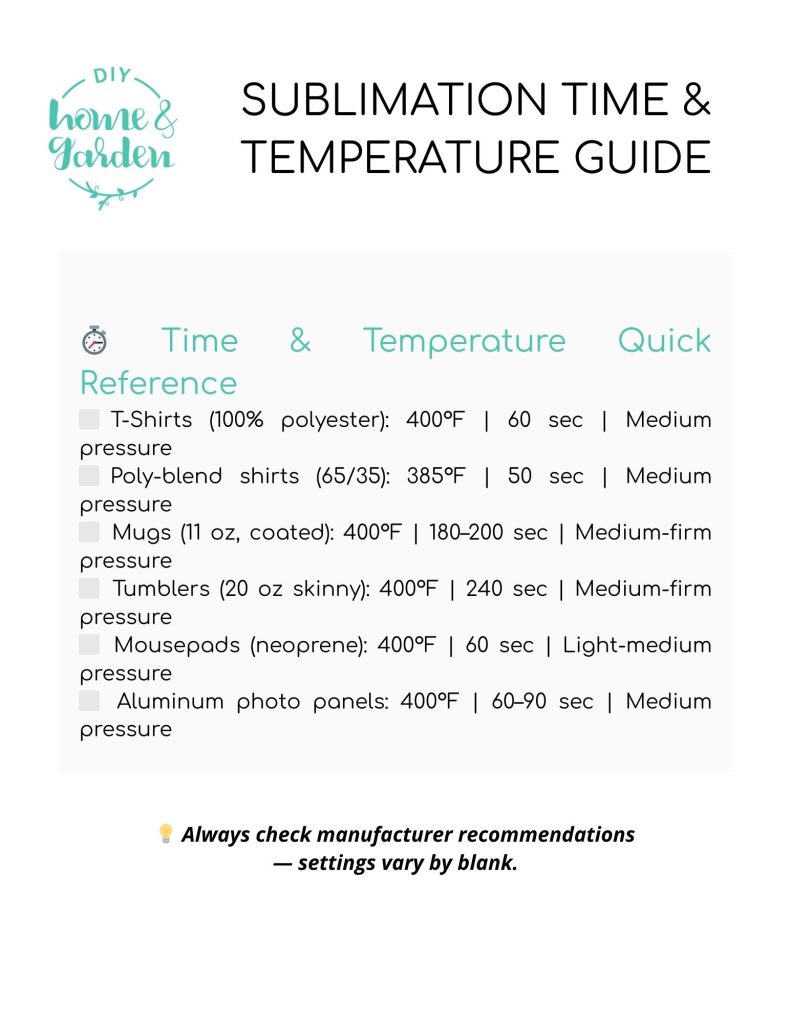
👉 I’ve made a free Sublimation Safety & Design Checklist PDF and a quick Time/Temperature Guide you can print and keep by your press – link to a digital copy in Canva here.
Turning Sublimation Into a Small Business
Sublimation can be more than a hobby — it can become a sublimation printing business.
- Find your niche: family gifts, homesteading designs, local pride gear.
- Where to sell: Etsy, craft fairs, MeWe groups, or your own website.
- Pricing: (Cost of materials + labor) x 2.5–3 = retail price.
- Scale smart: Buy blanks in bulk, batch press, and outsource big jobs.
- Marketing: Use keyword-rich titles (“custom sublimation mug for gardeners”), bundle items, and post lifestyle photos.
And remember, if you want help with large orders or bulk production, that’s exactly what I do in my new small business, Dart Custom Printing.
Maintaining Your Sublimation Equipment
- Print weekly to avoid clogs.
- Wipe presses and use butcher paper to protect surfaces.
- Store blanks in sealed bins, paper flat, inks away from sunlight.
- Adjust press pressure as hinges loosen over time.
A little maintenance goes a long way in avoiding frustration.
Sublimation Printing FAQ
Can I sublimate on cotton?
Not directly — sublimation needs polyester. Workarounds exist, but aren’t permanent.
Do I need a Cricut or Silhouette?
Nope. Helpful for vinyl, but not required for sublimation.
What’s the difference between sublimation and DTF?
Sublimation bonds dye into polyester. DTF prints on cotton/dark fabrics, but leaves a film-like feel.
Why do my prints look dull before pressing?
Totally normal. Colors pop after heat is applied.
How long will sublimation prints last?
On shirts, as long as the fabric lasts. On mugs/tumblers, years with proper care.
Final Thoughts & Next Steps
Sublimation is one of the most rewarding crafts you can learn. With the right setup, you’ll be making gifts, decor, and even running a small business in no time.
Here’s your action plan:
- Download your free Sublimation Checklists PDF (safety + design + time/temp chart).
- Try your first project — a t-shirt or mug is a great start.
- Explore design resources like Canva, Creative Fabrica, or Etsy PNG bundles.
- Shop with me:
- Dart Custom Printing → for custom & bulk sublimation (and DTF printing) services.
- Dart Devotionals Etsy Shop → for devotional sublimation products and printables.
With practice, you’ll be amazed at how vibrant and professional your projects look. And who knows? Today’s hobby could become tomorrow’s sublimation side hustle.