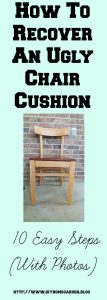
You may pass on furniture restoration projects because you don’t know how to re-cover a chair cushion. Actually, it’s an easy task. Follow our How-To Guide and just 10 easy steps, you can have a freshly reupholstered seat for your chair. It may take a couple of tries to get it just right. But it’s like any new skill. It takes just a little practice.
Let’s put it this way…the staples go in, they can also be pulled back out. So, if you make a mistake it’s easily corrected.
RELATED POST: 4 Ways to Make Your Sofa More Comfortable
I’ll start by saying that if you can find a square seat for your first project, that is the easiest shape to reupholster. For instance, the seat I’m sharing today has a curved back. It’s not difficult but takes just a little more working the fabric to make it lay right.
TOOLS YOU NEED
Reupholstering a seat only takes a few basic tools. In fact, you probably have most of them on hand. These are “must have” tools to get the job done.
- staple gun (heavy-duty, not a desk stapler. I’ve tried, it doesn’t work.)
- extra staples
- tape measure (to measure your seat size and fabric)
- scissors (to cut and trim fabric)
- pliers (in case you need to pull any staples back out)
- screwdriver (to re-attach you seat to the chair)
HOW TO RE-COVER A SEAT CUSHION STEP-BY-STEP WITH PHOTOS
- Prepare your fabric. Pre-wash and dry your fabric (if washable) so that it is pre-shrunk. Dust off your iron and iron the fabric. The smooth, wrinkle-free fabric gives the finished project a professional look.
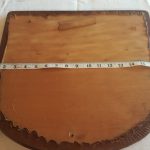
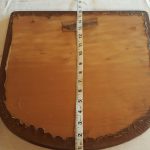
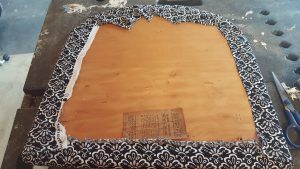
- Measure the length and width of your chair cushion. Allow 3 extra inches on each side. This gives you an inch and a half extra all the way around to allow you to staple the fabric to the back. If your seat is extra thick, measure it and add an extra fabric allowance. I like to write these down on my DIY Project Planner so I don’t forget them.

Measure the length and width before you cut the fabric.
Like all projects, a good measurement is needed before you cut materials - Cut your fabric, allowing for that extra overhang that you need to staple into the underside of the seat.
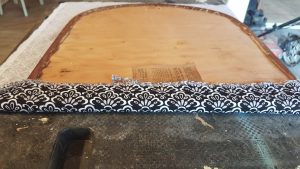
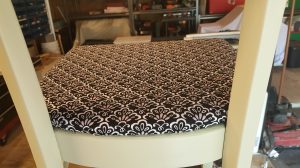
- Starting at the front end of the chair cushion, make sure your print is lined up correctly. I put three staples across the underside of the front to tack the fabric into place. See how I have the print of the pattern neatly across the front?

Line up your print at the front of the chair cushion to your liking, then tack it down with staples. - Fold the front corners. Think of it as though you are wrapping a birthday present. Make sure the folds are all concealed on the underside of the seat cushion…it’s OK to flip it over and peek to make sure there are no wrinkles or bubbles of fabric on the front. Keep each front corner nice and tight and staple them down.

Hold the fabric tight to create neat corners. - Keep holding fabric firmly as you run along the middle section. Staple as you go, I use a lot of staples, about one every 1/2″. Don’t actually pull the fabric so much that it goes wonky on you or you’ll be sad when you flip it back over! If you do make a mistake, use the pliers to pull out the staples and re-do it.
- Finally, I moved to the back of the chair. If you have a square cushion, you will staple in the middle, then create neat corners like you did on the front. However, I had a curved back. This required me to create little pintuck folds. I took a minute to make sure where I was creating the folds would be concealed by the frame of the chair. The triangle folds of fabric you see in my photo are because of these folds. If you have a square cushion, it should not look like this!
Finally, see the little triangles on the curved back? That’s where I created little pintuck folds to make the fabric move around the curved back. - Trim excess fabric. Make sure no frayed pieces of fabric will dangle down below the chair. You have done too much work for that!
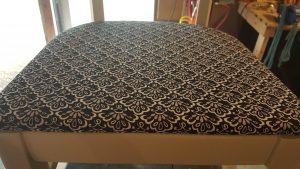
- Flip over and look at the top. If you see any wrinkles or pieces that aren’t taut across the sides, this is your last chance to fix it. Turn the seat back over, then pull the gaping fabric gently back under and hit it with a staple.
- Re-attach your seat to the chair. Here are the front and back views of how mine turned out.

The seat is no attached to the chair. The little tucks I made to curve the fabric are hidden by the chair frame. On the front side of the chair, the print pattern is line up neatly.

TIPS FOR SUCCESS:
- Neatness counts! Don’t overly obsess about the back of the seat cushion. I am always more concerned with the appearance of the front. But a neat back makes a neat front, they do go together. A professional upholsterer would probably chide me for my over-stapling. Meh.
- I didn’t remove the existing vinyl seat cover on this project, because it was very thin However, it’s difficult to staple through extra layers. Remove extra layers of fabric if it’s very thick.
- Practice, practice practice! This gets easier every time you do it.
- Keep your stapler in a “safe” position when not in use. This means staple discharged and the handle clamped down. I have shot my own foot with staples…in flip flops. Yes, it hurt! I used several big-girl words that day.
Once you have mastered reupholstering a simple square or slightly curved chair seat, you will find that you can take on more DIY projects. It’s one of those skills that open up a new world for you. Better yet, it gets easier every time you practice.
Oh, and the chair I was creating the seat for? That is a project that I’m currently working on. It will be a separate post in a week or two. So please check back. In my opinion, the transformation of this formerly drab chair is extraordinary.