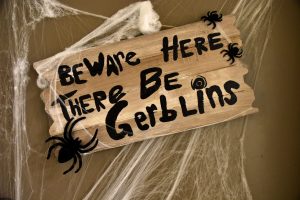
Deck out an entire wall or doorway without breaking the bank! Fall is a time is a whirlwind of holidays that leave little time and budget in between all the decor changes. But, not decorating for each holiday feels like missing out. Never fear, it is possible to throw together a solid, spooky scene for your doorway. Or a major hall to put you in that spirit without spending your candy budget!
There’s a lot of ways to shop on an extreme budget and most of that is based on timing your shopping around sales and coupons, but what I’ve done is try to find a cheap way to decorate that isn’t based entirely on luck of the draw.
So here it is, in three parts. With one easy DIY project and a $10 bill, you’ll decorate that empty spot that’s begging for some spook! And better yet, this Halloween decorating project won’t be too scary for the kiddos. Get them hands-on with this idea.
Step One: Cover a lot of Ground, Without a Lot of Dough with Webs!
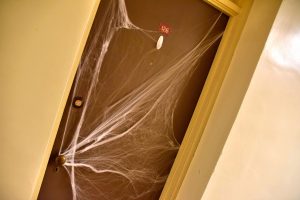
The best, easiest, and cheapest way to cover a massive amount of space for $3 or less, then go for bagged fake cobwebs. They come all tangled up, but once you start pulling them apart a little bag becomes an infestation.
Careful when placing to hide the end ‘seams’ of the webbing that are thicker white strings. Because those break the effect. Use those to tuck under the door frame or behind something.
Step Two: Spice up your Webs with residents!
The webs themselves are a classic look. But it’s instantly more impressive once you start adding someone to live on those webs.
Here’s where some options appear. First, raid your own stash from last Halloween or your craft bits. You just might have plastic spiders hanging around, but if not look out for pom-pom balls and pipe cleaners!
If you’ve got those two things, you can build your own spiders using the pom-pom for a body and cut pipe cleaners for legs. Add googly eyes if you want! Otherwise, turn to the stores now and look for sales.
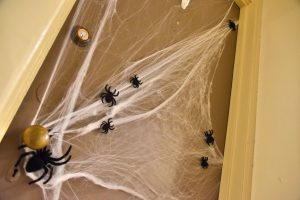
Don’t limit yourself to just the plastic, 3D spiders. Look for stickers, look at papers. Let the inspiration run wild and find something that fits the budget and strikes your fancy.
If you’ve got a bit extra wiggle room in your $10 bill, depending on what you had already in the house or got on sale, consider a statement spider that’s larger and more dramatic to make the webs look more like a nest for multitudes of spiderlings and their overlord!
Step Three: Now to get to Work!
Finally, it’s time to get your hands dirty! What does a giant monster web of spiders and their master need? A sign. A rustic, worn scary sign as though we’re exploring a dungeon. Then you’re going to need to light that web on fire with your torch to pass through.
Supplies
The first step to your sign is raiding your stash. Because that is the single best tip for saving money while crafting. So use up what you buy, reuse every little bit, and be creative with scraps!
Look for paints in whites, browns, blacks, and then accent colors. Most essentially is a brown tone that can tie any other blends together with a natural wood hue. If you don’t have brown, add that to the shopping list. But don’t worry: a basic brown paint will only add 99 cents.
Then, hit the shops. Keep your eyes peeled for sale bins and discarded clearance bits. But if you can’t find anything, what I recommend is a jagged edge rectangular one like mine with a prehung twine string on the back.
This will be the most expensive item of the budget. But if you use a coupon or get something a bit smaller in size, it will fit within that $10 limit!
Get Painting!
Start with a base layer. The point of this layer is to just cover that plain board and start changing it from a stock product into your product.
Consider what you want the end product to look like. For example, you may want dark edges and a lighter middle or a consistent shade or mismatched. For mine, I wanted to emphasize the four individual ‘boards’ within the signs so I added slightly different hues into the paint for different boards. Some of the boards had tinges of red, some yellow. Then, once the base is down, while it’s wet play with texture. Fill in any cracks in the wood. Try a brush. Try a sponge. Experiment.
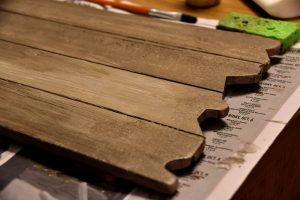
For mine, I used a sponge but dragged it down the board so it wasn’t quite so textured.
Then, let that dry before adding an accent layer. Take a long look at it and consider where you want darker colors, where you need more texture. Consider where your text will be though and don’t overly texture any spot where you want to put lettering.
Add Words
Last, and most frighteningly, is the text. But don’t be scared of hand lettering a little bit. This is a great budget project to start lettering on because since it’s meant to be spooky and scary it can be rough and it’ll just add to that look.
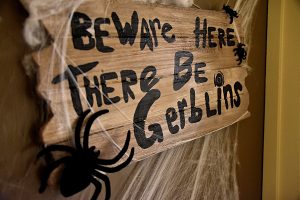
If you’re very worried, grab graphite paper and print your lettering and transfer it to the board. Otherwise, just take a glance at some reference fonts, mark out the letterings size on the board (as that is hard to eyeball), and then get to writin’!
And there you go! Put it all together and build your sign into the web wall and feel proud that you didn’t miss decorating for Halloween!
Have fun doing this project and all your other Halloween crafts. Enjoy!

