I was recently given an old handmade decorative shelf, so I’m sharing the results of my first attempt chalk painting an antique wax finish to give this old shelf a makeover. While I’ve chalk painted several projects, I’ve always done the clear or white wax, so the antique look is a first for me!
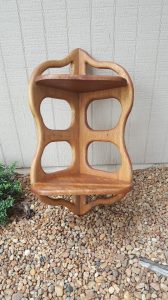
A friend recently gave me an old handmade decorative corner shelf. It looked old and outdated, but it’s very sturdy and well-made. There were several coats of polyurethane over a medium oak stain. I could see on the back of the piece, where some of the polyurethane had dripped, just how thick it was laid on there.
Here’s How to Use Chalk Paint and Antique Wax
This is what it looked like before I started the project:
STEP ONE: DISASSEMBLED AND SANDED THE SHELF:
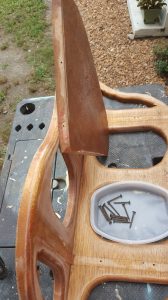
While I know that you don’t technically need to sand before chalk painting, I did. There were many bubbles in the thick polyurethane that I didn’t want to pop through the finished piece. Like I said, a sturdy piece not pretty!
I took the extra few minutes to disassemble the shelves and sand down that thick coat of poly, just because it was the right way to start this off!
I recycled a tray from a frozen lunch to hold all the screws safely while I worked.
STEP TWO: CHALK PAINTED THE SHELF:
I selected a pretty, fresh white with just a touch of gray for my chalk paint color. I intend to add this piece to my new shop. It’s a lovely neutral.
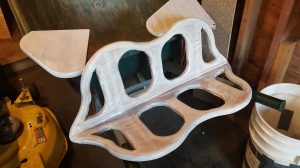
But even after sanding some of the polyurethane, it took two coats of chalk paint to make this paint stick! I used a foam brush for easy clean up since it’s a smaller project. It really gave it a smooth look with no brush lines.
STEP THREE: LET THE PAINT DRY!
Give the paint time to dry. I got so eager to start the antique waxing that I blooped the paint, had to smooth it out and touch it up. Which meant I had to wait even LONGER to apply the antique wax.
The moral of the story…let the paint dry thoroughly. Don’t be impatient with it or when you add the wax, you will mess up your paint.
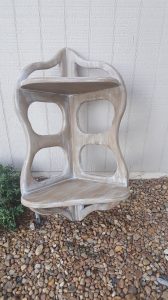
STEP FOUR: APPLY THE ANTIQUE WAX:
Use either the provided brush or a lint-free cloth to apply the antique wax (might be called dark wax in some product line-ups). I applied it like a stain, then went back with a lint-free cloth and smoothed out areas that it “grabbed” the color very quickly. This gave it an evenly streaky look, as though it had aged with these markings. The wax “grabbed” in the splits of this old wood and it actually looked kind of cool.
The wax “grabbed” in the splits and followed the grains of this old wood and it actually looked kind of cool. I found that I needed to work quickly with this product.
Let the antique wax dry for several hours.
STEP FIVE: BUFF THEN CLEAR WAX:
After the dark wax cured, I buffed it. Then, I applied clear wax to protect the finish. Let the clear wax dry and buff it out.
The Takeaway: A Little Chalk Paint and Antique Wax Can Give Old Pieces a Fresh Look
This was a project that was fun and easy. It was a quick first project to try with the antique wax. I will admit, I prefer a nice, shiny coat of new paint. Even so, I will admit that this piece does have a certain charm. If you like the antique and vintage and aged look this is a project that’s worth a try!