Pressure Canning Potatoes with Garlic (recipe + how to guide)
Learn how to safely can white potatoes for use later on in the year. These are easy to make, and a great first project for those new to pressure canning.
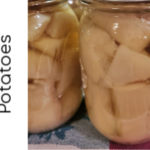
Yield: 7 one-pint jars
Equipment
- electric pressure canner or manual pressure canner
- stock pot (for parboiling the potatoes)
- canning jars, lids, and rings
- 7 one-pint canning jars
- canning accessory tools (jar lifter, magnetic lid wand, jar funnel)
Materials
- 5 pounds of boiling potatoes
- 7 cloves of garlic
- Canning salt
- Ball Fruit Fresh
Instructions
- Prepare your canner according to manufacturer instructions and set it aside.
- Sterilize your jars and rings in either your dishwasher on the sanitize setting or by boiling them for at least 10 minutes in a large pot.
- Prepare a large stockpot with cold water and a tablespoon or of Ball Fruitfresh to hold the color of the potatoes.
- Peel the spuds. Cut off any dark or "bad" spots. Peeling is necessary as the skins can hold botulism. Do no skip this step.
- Cut the potatoes into similarly sized chunks of about 2". Place them into the cold water.
- Place the batch of potatoes on the stove, and bring to a boil. Boil them for 10 to 15 minutes--just enough to release some of the starches and let them just start to soften. They will continue to cook throughout processing.
- While you boil the potatoes, fill a tea kettle with water and boil the packing liquid--that's it, just plain water!
- Towards the end of the 15 minutes of potato boiling, place your lids into a small sauce pot of simmering water. Check the directions on your lids for simmer time. I often wait to do this until after I pack my jars to ensure I don't do these too long. Other people prefer to do it before packing jars. Your choice.
- Use a large spoon or fork to carefully place the potatoes into the prepared and waiting jars. You need to pack them loosely, not tight! Add one clove of garlic (I smash mine to release the oils more potently) and 1/2 tsp. of canning salt to each jar.
- Top each jar of potatoes off with the canning liquid (the boiled water from the tea kettle--do not "recycle) the potato water of you'll add too much starch. Using the canning funnel helps eliminate mess! Leave 1" of headspace. This means you need 1" of room from the top of the jar to the product you are canning.
- Wipe down the rims of each jar using a paper towel and white vinegar. This removes any residue for a secure seal.
- Use the magnetic wand to remove lids from the simmering water. Carefully position the lid over the jar and hand tighten the rings securely.
- Place the jars into the pressure canner of your choosing.
- Process in the pressure cooker using the "canning" setting for 40 minutes. If you are uncertain of how to use your particular canner or have questions on processing times, contact your local extension office for further guidance.
- After the timer goes off, release the steam, carefully open the lid. Set your canned potatoes onto a protected surface to seal. Do not disturb them for 24 hours.
Notes
This instructional guide was written using my personal methodology and experience. I do not represent myself as a food safety expert. If you have any questions or need guidance, contact your local county extension office. Also, double check pressure cooker instructions against your model's manual--understand it before you use it!