Your garden could be overflowing with plenty of veggies, herbs, or fragrant flowers. But what are your plans for next spring? Want a garden splashed with lush color? Then you need to get some spring bulbs into the ground this autumn, so they bloom and brighten up your landscape next spring.
Spring bulbs are quite easy to plant and care for, most of them requiring minimal feeding throughout the growing season.
With just some basic knowledge, even a beginner can successfully grow beautiful spring bulbs.
And so, before we dive into the bulb varieties, here are some crucial growing tips to keep in mind.
When to plant the spring bulbs
Generally, the ideal time to plant spring-flowering bulbs is around six weeks before your area’s hard frost.
If you reside in colder climates (zones 4-7), consider planting the bulbs when the ground cools—when the evening temperatures average 40-50℉–about six to eight weeks (42-56 days) before the ground freezes.
However, for zones 8-10 (warmer climates), chill the bulbs in the refrigerator for about six to ten weeks (depending on your bulb’s variety) until the ground cools down enough for planting.
Spring bulbs average planting time chart
| Month | Zone |
| September | 2-3 |
| September to October | 4-5 |
| October to early November | 6-7 |
| November to early December | 8-9 |
| December (late) to early January | 10 |
Planning before you plant these spring bulbs
Most bulbs will naturally multiply or come back year after year hence the need for proper planning—so you enjoy them for years from just a single planting.
- Consider bloom time. To have flowers throughout spring, plant bulbs with varying bloom times. Incorporate early, mid, and late-season bloomers.
- Plant the bulbs in clusters for an enhanced visual impact. If possible, have the shorter ones in bed front or as borders.
- For the varieties that flower simultaneously, consider layering the plants’ heights beginning front to back.
- Consider companion perennial plants like thyme, sedum, hosta, cranesbill, or coral bells—to keep the planting location going even when the bulbs go dormant.
Ten Spring Bulbs to Plant This Fall (for more colorful springtime!)
By now, you must be wondering. What spring bulbs should you plant?
1 – Daffodil
Native to North Africa and Europe, daffodils are among the most popular and easiest spring bulbs to grow. Daffodils look great in meadows, garden beds, or in rows lining pathways and make perfect springtime cut flowers.
- These sun-lovers grow best in well-drained, moist, and moderately fertile soils with neutral to acidic pH levels and rarely require feeding.
- You may only need to top dress with bone or bulb food when the plants under-bloom. Feed when the leaves first appear, then re-feed (lightly) when they flower.
- Your best bet is to plant in mid-late autumn, so the plants begin rearing heads in early spring as they take advantage of the season’s early sunshine to bloom healthily and abundantly.
- Plant at least six inches (15 cm) deep with a 6-inch apart spacing, making sure to deadhead once the flowers fade.
- Water regularly—in dry fall and spring, and into the winter if your area doesn’t experience snow in the winter.
- When selecting the daffodil bulbs to plant, choose the ones with large, firm shapes—featuring a dry papery covering.
Daffodil
| Sun exposure | Full sun/partial shade |
| Hardiness zone | 3-10 |
| Soil type | Well-drained, fertile, and moist |
| Soil pH | Neutral to acidic |
| Planting depth | 6 inches |
| Spacing | 6 inches apart |
| Mature size | 6-12 inches wide, 12-18 inches tall |
| Blooming season | Spring |
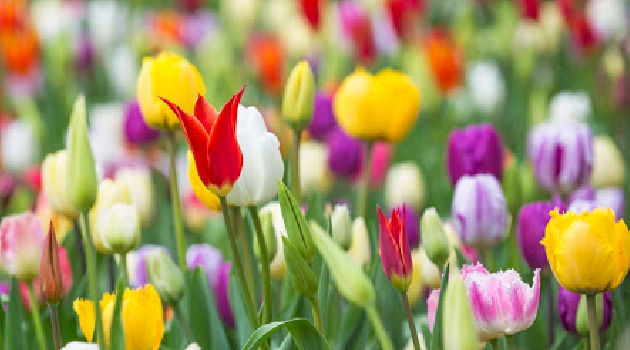
2 – Tulips
Tulips, though perennials from a botanical perspective, most gardeners grow it as an annual, especially the hybrid varieties—therefore planting new bulbs every other autumn.
- If growing them as perennials, just know that most varieties, especially the hybrids, often begin declining after two (or so) years.
- However, the species variety will continue blooming vigorously every year and may even reproduce with dividable offsets to provide more plants.
- Just ensure that when you grow tulips as perennials, you remove the flower stalks once they flower, leaving the foliage intact until it turns yellow—to help replenish the bulb’s energy.
- Generally, all tulips varieties prefer full sun and thrive best in well-draining, fertile, and neutral to slightly acidic, dry, or sandy soil.
- Plant them in fall—four to eight inches deep with a spacing of two to five inches between them(depending on their size).
- Because tulips dislike excessive moisture, you only want to water them thoroughly during planting then withhold watering except in the extended dry seasons.
- When planting, you can also add in some bone meal, granular fertilizer, or compost to give the plants a good start. Feed them again when they re-sprout the following spring. After that, let them be. Tulips don’t need too much feeding.
Tulips
| Sun exposure | Full sun, part sun |
| Hardiness zone | 3-8 |
| Soil type | Well-drained, fertile, medium-moisture |
| Soil pH | 6.0-7.0 |
| Planting depth | 4-8 inches |
| Spacing | 2-5 inches apart |
| Mature size | 8-30 inches tall (depending on the variety) |
| Blooming season | Early to late spring |
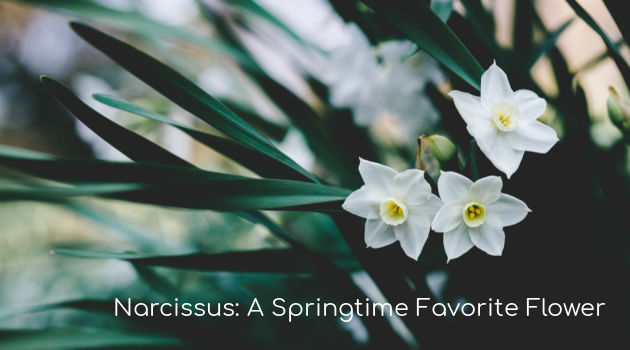
3 – Narcissus
Narcissus is a Mediterranean native and comes in shades of yellow and white. This plant features a natural tubular base, three petals, three petal-like sepals, and a central cup-like addition that sometimes may be of a contrasting color. Narcissus genus comprises dozens of species, hybrids, forms, and varieties, with the most popular ones being daffodils, paperwhites, and jonquils.
- They look great in borders and naturalized drifts right at the feet of deciduous trees. But you can still grow them in beds as well as in large containers.
- In borders, beds, and large containers, plant narcissus at a depth thrice the bulbs’ height; however, plant slightly deeper in lawns—15 cm deep.
- Plant the bulbs from August to November.
- Remove only the flower heads once they fade to prevent the plant from directing its energy to seed production, which may eventually compromise its performance the following year.
- The leaves should be left intact (even after they turn yellow) so they wilt back on their own.
- To propagate your narcissus, divide the overcrowded clumps late in the summer and plant the offsets elsewhere in your garden.
- Alternatively, propagate them from your fresh seeds collected in summer and sown in autumn in pots outdoors.
Narcissus
| Sun exposure | Full sun, partial shade |
| Hardiness zone | 3-9 |
| Soil type | Rich, moist, and well-drained |
| Soil pH | Neutral to acidic |
| Planting depth | 6 inches |
| Spacing | 6 inches |
| Mature size | 12-18 inches tall |
| Blooming season | Spring |
5 – Hyacinth
Like most perennials, hyacinths are easy to grow, often coming back year after year.
When most of your garden is just waking up, these mid-spring bloomers take it to themselves to beautify your planting space with pastel color while also saturating the air with their intense fragrance. No wonder many garderners call this flower ‘nature’s perfume.’
- You can grow hyacinths in pots, ground, or water—in some bulb vase (with no soil).
- Early fall (six to eight weeks before your area’s first frost) is usually their best spring bulb planting time as they will grow slowly to emerge in the spring as shoots.
- For stronger and a far-reaching scent, grow in large blocks.
Hyacinth
| Sun exposure | Full sun |
| Hardiness zone | 4-8 |
| Soil type | Moist, well-drained |
| Soil pH | Neutral to acidic |
| Planting depth | 4 inches |
| Spacing | 3-4 inches apart |
| Mature size | 3-6 inches wide, 6-12 inches tall |
| Blooming season | Spring |
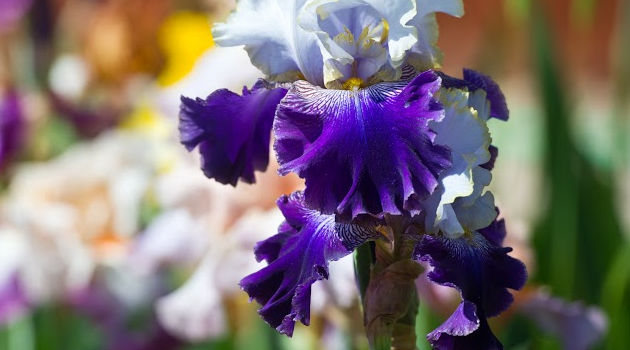
5 – Bearded Iris
It’s among the popular species of irises with several other plant sub-categories under it—the tall bearded, short bearded, intermediary bearded, border bearded, and miniature bearded.
Unlike its beardless sister (better known as the crested iris), the bearded iris’ distinctive six-petaled flowers feature three inner upright petals (standards) and three outer hanging petals (referred to as falls), and some soft hairs lining the center of the falls. Hence the name ‘bearded.’
- In the crested iris, the hairs form a ridge or sometimes a comb instead.
- Bearded irises are quite easy to grow as long as you plant them in well-draining soil in a sunny spot.
- Plant them in late summer after they’re done actively growing—spacing them twelve inches apart so you won’t have to divide them frequently.
- Remember to leave the soil bare (without mulch) to reduce the chances of the rhizomes rotting. Deep planting can also lead to rot.
Bearded iris
| Sun exposure | Full sun |
| Hardiness zone | 3-9 |
| Soil type | Average with good drainage |
| Soil pH | Slightly acidic to neutral |
| Planting depth | 4 inches deep, 10 inches wide |
| Spacing | 12 inches apart |
| Mature size | 12-40 inches tall, spreads 1-2 feet |
| Blooming season | Spring |
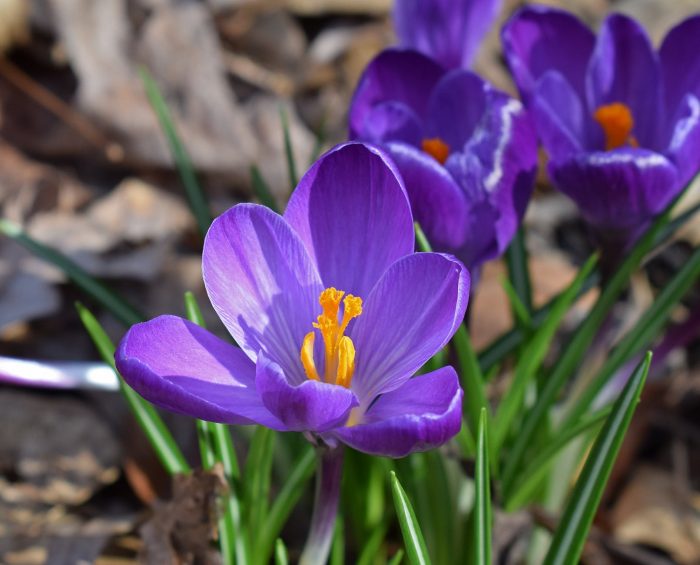
6 – Crocus
These low-growing perennials from the iris family are often considered bulbs even though they’re corms.
You’ll notice them emerging through the snow well before the other flowers appear on your landscape, signaling the arrival of spring. And though often grown for early spring color, there are crocus varieties that flower in early winter and late fall—in shades of yellow, lavender, and mauve.
- For spring blooms, plant in early fall. The plants grow fast and will typically bloom in 2-5 weeks after the temperatures rise and the bulbs begin to actively grow in the spring.
- Plant the corms 4 inches deep with a 2-4 inches spacing, making sure to add bone meal or bulb food to the soil, so the plants have a good start.
- Consider mixing different crocus species to stretch the bloom time. If possible, also plant them where the other plants will adequately fill in and shelter their foliage.
- Crocuses often fade quickly when the weather gets hot, and so hiding amidst the other plants when the weather heats up will help prolong their blooming and allow them to reserve energy for the next season.
Crocus
| Sun exposure | Full to part sun |
| Hardiness zone | 3-8 |
| Soil type | well-draining soil |
| Soil pH | Neutral |
| Planting depth | 4 inches |
| Spacing | 2-4 inches |
| Mature size | 1-3 inches wide, 6 inches tall |
| Blooming season | Spring |
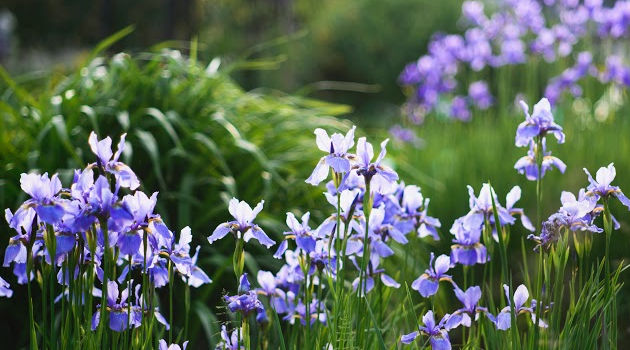
7 – Siberian Iris
You can count on this easy grower for a perennial bloom for years.
Though not as showy as most irises, the Siberian iris is more drought-tolerant and will attract beneficial insects (butterflies and bees) to your garden. Conversely, deer and rabbits avoid it.
The plant grows from underground rhizomes, which spread out beneath the soil’s surface to form a robust network of “roots” that hold the soil during rainstorms.
- Siberian iris adapts to different planting times. However, you want to plant it in autumn (or late summer) to enjoy the blooms sooner.
- Carefully choose a place to grow it, considering its fast-spreading nature.
- Unlike bearded iris (Iris germanica), Siberian iris’ vase-shaped foliage clumps remain attractive even post the blooming season, beautifully displaying their bluish-green color.
- Siberian iris varieties include ‘Snow Queen’ (which thrive in zones 5-8, with white and yellow flowers), ‘Caesar’s Brother’ (grow in zones 3-8, purple flowers), ‘Butter and Sugar’ (zones 3-8, white and yellow flowers).
Siberian Iris
| Sun exposure | Full sun to partial shade |
| Hardiness zone | 3-9 |
| Soil type | Rich, well-drained, with medium moisture |
| Soil pH | Neutral to slightly acidic |
| Planting depth | 1-2 inches |
| Spacing | 1-2 inches apart |
| Mature size | 3-4 feet tall |
| Blooming season | Early summer, Spring, Late Spring, Summer |
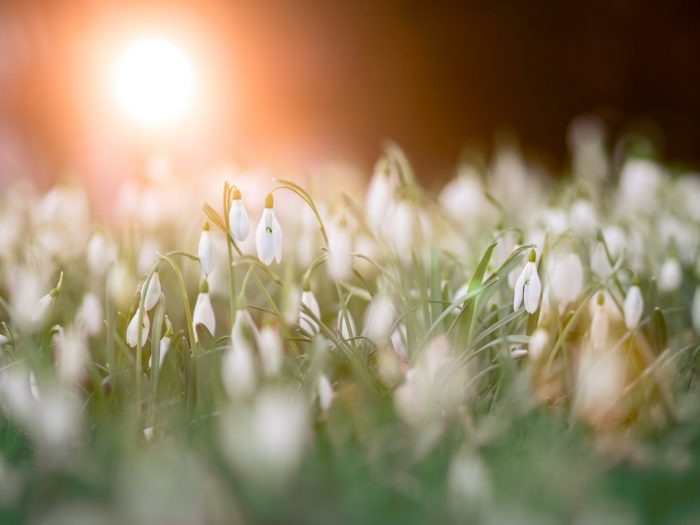
8 – Snowdrops
Galanthus nivalus (better known as snowdrops) are delicate white flowers with three long outer petals plus three inner ones—together hanging from a sole green stem. They grow low and spread fast. Feel free to put these spring bulbs in any spot where you need a good amount of coverage.
- Snowdrop flowers emerge from the frozen ground in late winter to early spring, blooming in temperatures you would rather avoid. Not even a fresh snow coat can dampen their spirits.
- They’re adaptable, thriving in full or partial sun and moist/dry soil; however, they offer them plenty of compost (organic matter) for abundant blooms.
- For a greater visual impact in the winter, grow them in groups. Plant the bulbs around 2-3 inches deep and 3 inches apart.
- The best growing time is usually in late autumn.
Snowdrops
| Sun exposure | Full sun/partial shade |
| Hardiness zone | 3-8 |
| Soil type | Moderately moist, humus-rich, and well-draining |
| Soil pH | Neutral |
| Planting depth | 2-3 inches |
| Spacing | 3 inches |
| Mature size | Up to 8 inches tall |
| Blooming season | Spring, Autumn, Winter |
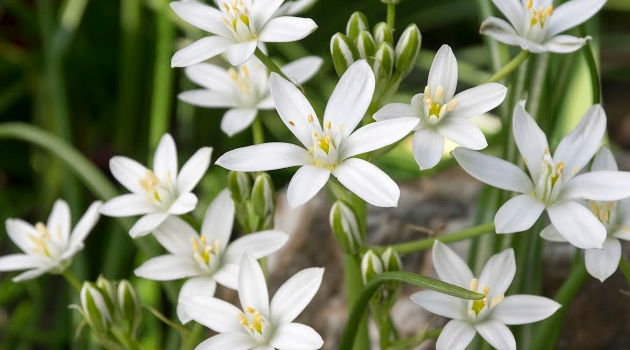
9 – Star of Bethlehem
This perennial flower grows in clumps and features narrow grass-like leaves that extend about a foot long.
They bloom in late spring, with each flower stalk bearing approximately ten to twenty star-shaped blooms—almost an inch across. It’s amazing how the blooms open up late in the morning then close up at sunset and during cloudy weather.
- The Star of Bethlehem grows and spreads fast. Therefore, some areas list amount the number of invasive species. You may want to grow it in containers for easier control.
- Unlike other plants, this plant doesn’t necessarily require care, except to prevent the excessive spread. If it becomes too prolific, just remove the entire bulb to terminate its growth.
- Star of Bethlehem will thrive in zones four through, though still hardy in zone three with wintertime mulching.
Star of Bethlehem
| Sun exposure | Full, partial |
| Hardiness zone | 4-9 |
| Soil type | Loamy, well-drained, moist |
| Soil pH | Acidic, neutral, alkaline |
| Planting depth | 4 inches |
| Spacing | At least 4 inches apart |
| Mature size | 12-24 inches wide, 6-12 inches tall |
| Blooming season | Spring |
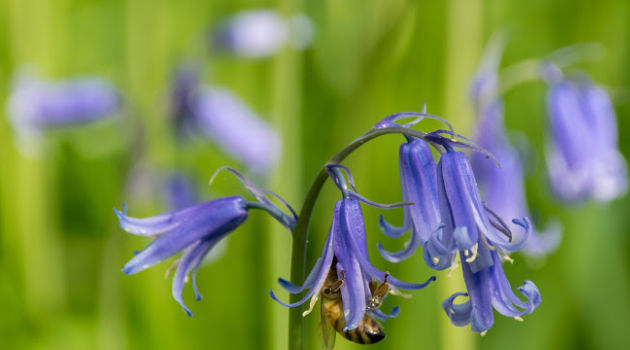
10 – Bluebell
These dainty bulbous perennials offer a profusion of colors, including pink, deep purple, blue, and white—beginning April to mid-May.
Though there are several plants with the common name, bluebells, two bulbs are best for autumn planting—the English bluebells (Hyacinthoides non-scripta) and Spanish bluebells (Hyacinthoides hispanica)—also commonly referred to as wood hyacinths.
- Both plants will naturalize, spreading to produce plenty of nodding tubular flowers that form an incredible carpeting effect.
- Bluebells helps you to attract hummingbirds.
- Planted in small borders, these spring bulbs can easily bypass their assigned territory, and so, you want to have them on your lawn near a tree.
- They also make great edges in woodlands.
- English bluebells exhibit quite a unique blooming style, carrying the flowers on just one side of the stalk—eventually bending the stalk under their weight.
- They’re more heat-sensitive (compared to the Spanish species). Therefore, water regularly or keep in partially shaded areas.
- Spanish bluebells are tough and will tolerate a bit more sun. They uprightly carry their flower stalks amid sword-like leaves, though not as fragrant as the English type.
- For cut flowers, use English bluebells.
- Both species bloom beginning mid-spring to early summer, therefore plant in early fall.
- Irrigate regularly over fall and winter for excellent results.
Bluebell
| Sun exposure | Partial shade |
| Hardiness zone | 4-9 |
| Soil needs | Rich, moist, well-draining |
| Soil pH | Neutral |
| Planting depth | 4 inches |
| Spacing | 4 inches |
| Mature size | 12 inches |
| Blooming season | Spring |
Final Care Tips for Planting Spring Bulbs
- Too much moisture and the plants will rot, and so, ensure your soil drains well (loamy or slightly sandy soil is ideal) and that the location receives adequate sunlight.
- For heavy clay soils, amend with a few inches of organic matter or compost before planting—for a nutrient boost and enhanced drainage.
- How deep to plant will depend on the bulb’s height. Ensure the planting hole is thrice deeper than the bulb’s height. For instance, for a 2-inch tall bulb, dig a hole 6 inches deep.
- When planting, make sure the roots face downward and the pointy end upwards.
- Cover with soil, then mulch lightly to suppress weeds and help retain moisture.
- Plant the bulb on its sides if you can’t discern the top or bottom, so it still finds its way out to the surface.
- After planting, apply a low-nitrogen fertilizer and water deeply to help the bulbs settle well into the soil and also get the much-needed moisture for rooting.
- Troubled by critters? Consider staking down chicken wire or plant the bulbs in wire cages or bulb baskets.
- Once spring bulb blooming is over, cut back (only) the flower stalk. Leave the foliage intact until it becomes yellow and dies to the ground—a special way of gathering and storing up energy for the following year.
- For the spring bulbs (in warmer climates) that require chilling, dig up and store until the pre-chilling time the next fall. Leave the bulbs in the ground if you reside in colder climates; that way, they can multiply easily and come back year after year.

Today, she also serves as a content producer and sometimes editor. Her vast (and often surprising!) skillset enables her to conquer any challenges.
She loves writing about gardening, wellness, and raising healthy children. As a full-time author and parent of two children, Maureen knows a trick or two on these topics.
After gaining valuable experience in blogging and content production with the DIY Home & Garden team, Maureen branched out and started her own publication, as well. Now, she proudly publishes the website: The Perfect Parenting Place.