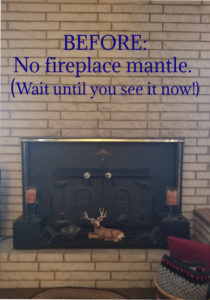
Do you love fireplace mantels? Well, I do, too. Unfortunately, my home had mantle-less fireplace for the first five years we lived here. And, my love for live edge wood left me longing for a mantlepiece of my own.
Unfortunately, my circa-1965 home featured a chimney that was in poor condition when we moved in. So, for safety, we capped the fireplace chimney.
To make matters worse, the white bricks looked like a glaring blank slate. And, the firebox is a beast. There was no way we could pull it out.
So, instead of trying to “pretty up” what could not be, we chose to work with that blank canvas, dress up, and make it look so much better.
What it needed was very clear–a mantel to break up the large expanse of white brick. Bland, right?
About Fireplace Mantels

We think of fireplace mantels as decorative today. However, centuries ago, they served a vital role in every household.
First and foremost, our ancestors used this slab of wood as a hood, of sorts. It helped to keep smoke and soot from billowing straight up the wall. And, it recirculated some of that smoke back into the unit (or so they hoped!).
Secondly, it served as a shelf. This was where family members could hang their socks up to dry, so to speak.
It wasn’t until more recent years that the advent of electricity and vent fans turned fireplace mantels into purely decorative pieces where we display our pretty things. Cool, huh?
Live Edge Wood
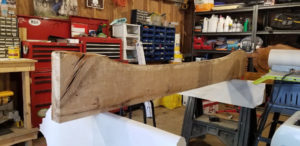
Instead of a large mantlepiece that trimmed around the firebox, we chose a live edge wood mantle.
We realized that a surround-type mantelpiece wouldn’t work for us. That’s because the original homeowner had built a brick firewood box that juts out from the fireplace wall. Unfortunately, there is no flooring underneath that box. So we created a top for it, upholstered it, and turned it into a bench. Regardless, we needed a floating shelf.
My husband and I love the look of live edge wood. It lends warmth and an interesting texture anywhere you would ever want to use it. And this room definitely needed a pop of visual interest.
We headed off to a reclaimed wood lot about an hour away from our home. There, we selected a piece we thought would work well.
Fortunately, my husband enjoys woodworking. I enjoy planning projects, and I can visualize the outcome. Together, we put a plan into place. Well… Let’s be honest. It was all his part, from here! lol.
Here’s how he transformed the raw wood into the mantel we wanted
First, know that we selected a piece of red oak wood that was seasoned and ready to work with. Some wood might be green, and you must store it away. We selected a piece that was ready to use.
Also, know that this is not a one day job. To obtain a perfect finish, you’ll need to allow drying time between coats of polyurethane, and you’ll spend a lot of time sanding and getting things just so. In the end, however, you’ll find the patience is worth the while.
1 – Removed the bark to expose the edge
Ok. We did not remember to take a photo. But, our slab had bits of bark still clinging to it. He carefully chiseled it off, then used a grinder to remove the remaining pieces of wood until he achieved a fairly smooth finish.
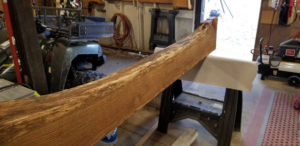
2 – Sanding away the rough spots
Second, we decided to sand the top and bottom. Some live edge wood mantels have a rougher texture. It’s a matter of choice. I envisioned a smoother finish that I’d be able to dust without snagging the dustcloth.
So, the sanding began. And continued. For way longer than we would have thought. He used an electric belt sander and an orbital sander until both the top and the bottom of the wood was smooth. As he worked, he realized, it also exposed a very pretty and light color and made all the grains in the wood appear even more dramatically.
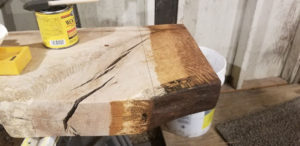
3 – Testing the stain color
Before you apply stain to a custom piece, you should always test the color on an inconspicuous location. Hubby tested two colors on an end that was about to be lopped off.
4 – Cutting the wood to the correct length
When you purchase reclaimed wood, the length might not be absolutely perfect. What’s more important is that the edge is straight. For example, we needed the back edge of the mantel to mount cleanly to the bricks. So, we didn’t sweat the length too much. It gave us an excuse to fire up more power tools.
However, before cutting, we measured. Three times. Then we measured one more time, marked the wood, and cut.
5 – Applying the stain
Carefully stain your mantelpiece. Wear gloves to protect your hands, and brush on the stain evenly. Allow it to penetrate the wood for a few seconds, and wipe it back off. How long you will leave the stain on before wiping depends on how porous your wood is. Our mantel grabbed the color almost instantly.
Work with a good quality stain, don’t skimp on the cheapest brands. We used a MinWax product, as we’ve had consistent and excellent results with the brand over the years. We chose the color Natural, and it made the wood grains pop like nobody’s business.
Watch for drips and runs. Stain in a well-ventilated area (we did ours in the workshop with the doors open).
And, most importantly, remain patient. It’s tempting to flip the mantel over and attempt to stain the other side. Don’t do it. You will be sad if you bloop up your hard work.
6 – Polyurethane x3
Finally, both sides of the fireplace mantel were stained, dry, and ready for three coats of polyurethane.
This step is necessary because the polyurethane protects the wood, gives it a smoother look, and creates an eye-appealing finish.
Apply polyurethane in light, even coats. It must dry completely, and totally, then have a light sanding between coats. He used 220 grit sandpaper for this task.
7 – Hanging the fireplace mantel
Ok. So we are DIY types of people. But, even we do have our limits. We drew the line at drilling into the white limestone bricks. This was a time to NOT DIY.
We ordered mounting brackets (which guaranteed to support 150 pounds of weight) and called a home remodeling specialist we knew. He stopped by and helped us mount the fireplace mantel, safely and securely. It weighs A LOT. And, we feared being able to get it to hang correctly without destroying the bricks.
Fuggedaboutit it! Call for help.
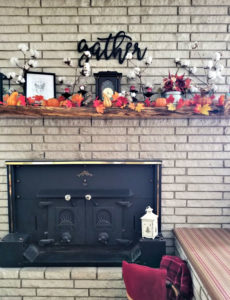
The Final Result of Researching Live Edge Fireplace Mantels
In the end, we are tickled with the outcome of our research (and a little bit of trial and error). Before we started, we spent hours poring over information on Pinterest and woodworking sites. Unfortunately, we found nobody listed all the steps comprehensively. And that’s why we ultimately decided to share this content with you.
If you attempt this project, save your cut off ends for experimenting with color and polyurethane so that you don’t make a mess of your unique showpiece. Remain patient, and breathe! In the end, you’ll be well-deserving of the enjoyment you get from your fireplace mantel.
She has a B.S.Ed. in Secondary Education/English and a Spanish Minor. In addition, she holds a Certificates in Natural Health and Herbology from accredited programs. She pursued these natural wellness certifications due to her love for herb gardening.
Despite freelancing to make a living, her love is "all things home."
Deborah grew up in a family that grew a large vegetable garden and a fruit orchard, helping her parents pull weeds and can home-grown foods as part of her childhood. In fact, she had no idea that she could purchase veggies and fruits in pre-packed steel cans until she went to college and made a food run.
Today, she lives in Bertie County, North Carolina, an agricultural rural area with more chickens than people. She lives with her husband and two rescue pets a sweet toy fox terrier and a cat who showed up one day and moved into the house. Together, they enjoy DIY projects, furniture refinishing, gardening, and canning.