Today, I’m sharing ideas and tips on how to repaint a locker and upcycle it to use in your home. I guess we can say, grab your paintbrushes, it’s time to locker up!
You can find old lockers…for cheap prices…at yard sales, auctions, and estate sales. Buy them cheap, reimagine how you can use an old one in your home, give it some TLC, and you will have a one of a kind item for your home. On top of that, they are great for keeping things organized while adding visual interest to your home.
RELATED POST: Furniture Waste F-Waste Upcycling and Thrifting
It’s not that hard to upcycle a locker. While the transformations you see on the internet are extraordinary, it really boils down to having the imagination and vision to picture your desired outcome. The more you think outside the box…or locker, in this case…the more dramatic the transformation can be.
Still not convinced that it can work in your home? Here are some that inspire me…I dream of these projects as I search for the perfect one for my next DIY locker project.
UPCYCLED LOCKER INSPIRATIONS
DIY LOCKER FOR LAUNDRY ROOM STORAGE

A simple DIY locker project is a laundry room or mud room storage locker. This takes the least work. In fact, the one I just refinished is being used as a storage space for my kitchen entryway.
Keeping it simple for your first project is a great plan! Use your locker for its intended purpose…storing things. Make it cute and use if to store laundry items in your laundry room. Or, slide a narrow one into the corner of your kitchen to store pantry items. A locker is also fantastic for keeping items organized in your mudroom.
Indeed, this is a very useful way to use a tall or narrow locker.
DIY LOCKER UPCYCLE: STORAGE BENCH FOR THE MUDROOM

A second fantastic locker upcycling project is a storage bench.
You can achieve this with a row of lockers as shown. Or, you can take a tall one and flip it onto its side. Repainted lockers are durable and stylish. Placed in the laundry room, each family member could be assigned his or her own space to put odds and ends when they come home each day!
Top the locker bench off by sewing a simple cushion out of a durable fabric. Don’t skimp on cheap or thin fabric, this will get daily use!
LOCKER UPCYCLE: BOOKCASE OR OPEN SHELVING

This upcycle transforms the locker from closed storage space to open storage shelving. It can be used as a bookshelf. In addition, you could add cute baskets for practical storage.
I can envision wiring it with lights and adding curio items to create a cute and funky display of my favorite things!
UPCYCLED LOCKER: MEDIA CENTER OR TV STAND

These tall lockers have been turned to their side and repurposed as a media center or tv stand.
Adding casters adds an industrial touch and a practical way to pull the unit away from the wall for spring cleaning.
I don’t know about you, but I always have dust bunnies behind my entertainment unit. I’d like to think that casters would make me clean behind it more often. But being honest, nope. I’d still have dog hair everywhere!
LOCKER UPCYCLED INTO A BAR

This is where that thinking outside the box comes in. This is such an inspiration to me.
This bar is crafted from an upcycled locker. It gives plenty of storage space to close the doors and keep glassware and bottles free of dust. Parents have a safe place to lock up spirits when they aren’t home to supervise curious kids.
And, it looks super-stylish. The black finish and black painted hardware have a trendy monochromatic appeal that would match any decor.
I’m not much of a hard liquor drinker, but this would make an amazing wine bar for me!
DIY: HOW TO REFINISH A LOCKER
Refinishing a locker sounds complicated, but it’s really a matter of what look you want to achieve.
For example, it you want a gritty, industrial look you may choose to sand off a bit of rust, knock out the dents, tighten up the hardware and let your locker remain au natural.
I, on the other hand, prefer pristine paint that’s really cute and adds color. Of course, I take the road more complicated!
The locker I recently bought for $10 at a yard sale is a narrow, single unit. At the time I saw it, I hadn’t thought about DIY locker projects. But a quick search of internet gave me the inspiration pieces which I shared. I decided to give it a go. I kept it simple and created a storage piece for my kitchen, right next to the back door.
This was how it looked when I found it:
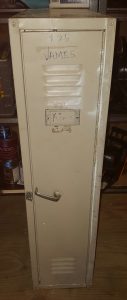
This locker didn’t close just right, it had dings and creases in the metal, and small places where the paint had rubbed off. Rust was just starting to form.
STEP ONE: HARDWARE
I started by removing all the hardware. Nothing lined up right anyways so it all needed to get adjusted.
I decided to keep the hardware original and my husband applied Flitz cleaner and it polished right back up to looking brand new.
You could also spray paint the hardware at this point, and set it aside to dry as you tackle the next steps.
STEP TWO: PUSH OUT DENTS
My husband and I gently pushed out the dents, working the metal with care and finesse. This is how we did this. Wait for it… I held a rubber mallet on the outside of the locker. He hammered.
This is a super-specialized technique that requires years of practice… Wait for it… I held a rubber mallet on the outside of the locker. He hammered it with a second rubber mallet from the inside. This popped the dents out. A couple little dings remain, but we decided that it added character.
STEP THREE: SAND AND PRIME
First, I sanded off rusted areas as well as areas where the paint was dimpled or starting to peel to develop a smooth surface.
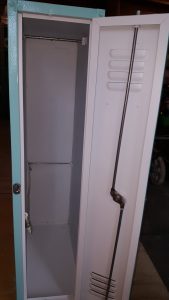
Then I primed the inside and outside with Sherwin-Williams Multi-Purpose Interior Oil Based Primer in white.
I chose this primer for a couple of reasons. First, because the locker is metal, the oil based primer will seal it and help to prevent further rusting. Second, I chose white because white primer makes white, light, and brightly colored finishes look flawless.
Both sanding and priming prepare you for painting on a perfect finish.
STEP FOUR: PAINT THE LOCKER
Lastly, time to paint the locker. I chose Sherwin Williams All Surface Enamel. This is also oil-based paint. I love Tiffany Blue which can be difficult to match exactly. I took a Tiffany box to the store, and the nice guy at my local Sherwin Williams helped me with color selection. All in all, the Sherwin Williams color, Little Blue Box, was a perfect match!
My readers know that my husband is an awesome painter. In fact, he painted the locker for me. It only took two coats of paint with a foam roller. The result is a glossy, shiny finish. It came out so pretty…it’s almost mirror-like.
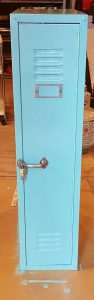
I decided to keep the inside a white primer color. It gives the inside a neat, light, bright appearance. When the door is open, the contrast between the blue and the white is very appealing.
STEP FIVE: REATTACH THE HARDWARE:
Because this was an oil-based enamel finish paint, I let the paint dry for almost two full days. The paint was flawless and I didn’t want to mess it up. After it dried, we reattached the hardware inside and out. We took care to make sure that everything lined back up properly so that the door now opens and closes correctly.
So the next time you are at a flea market and see rusting old lockers, snap them up! With just a little creative thinking and time, you can have a customized creation. DIY locker upcycling is fun and easy. In fact, it’s downright addicting. I’m already keeping my eyes open for the next one that I can upcycle.
She has a B.S.Ed. in Secondary Education/English and a Spanish Minor. In addition, she holds a Certificates in Natural Health and Herbology from accredited programs. She pursued these natural wellness certifications due to her love for herb gardening.
Despite freelancing to make a living, her love is "all things home."
Deborah grew up in a family that grew a large vegetable garden and a fruit orchard, helping her parents pull weeds and can home-grown foods as part of her childhood. In fact, she had no idea that she could purchase veggies and fruits in pre-packed steel cans until she went to college and made a food run.
Today, she lives in Bertie County, North Carolina, an agricultural rural area with more chickens than people. She lives with her husband and two rescue pets a sweet toy fox terrier and a cat who showed up one day and moved into the house. Together, they enjoy DIY projects, furniture refinishing, gardening, and canning.